Scenegraph
Scenegraph is perhaps the most fundamental concept in MAGES SDK. It is this root module that powers and distinguishes ORamaVR’s educational platform from the herd.
In this section, we proceed to present Scenegraph’s architecture and how it structures all development.
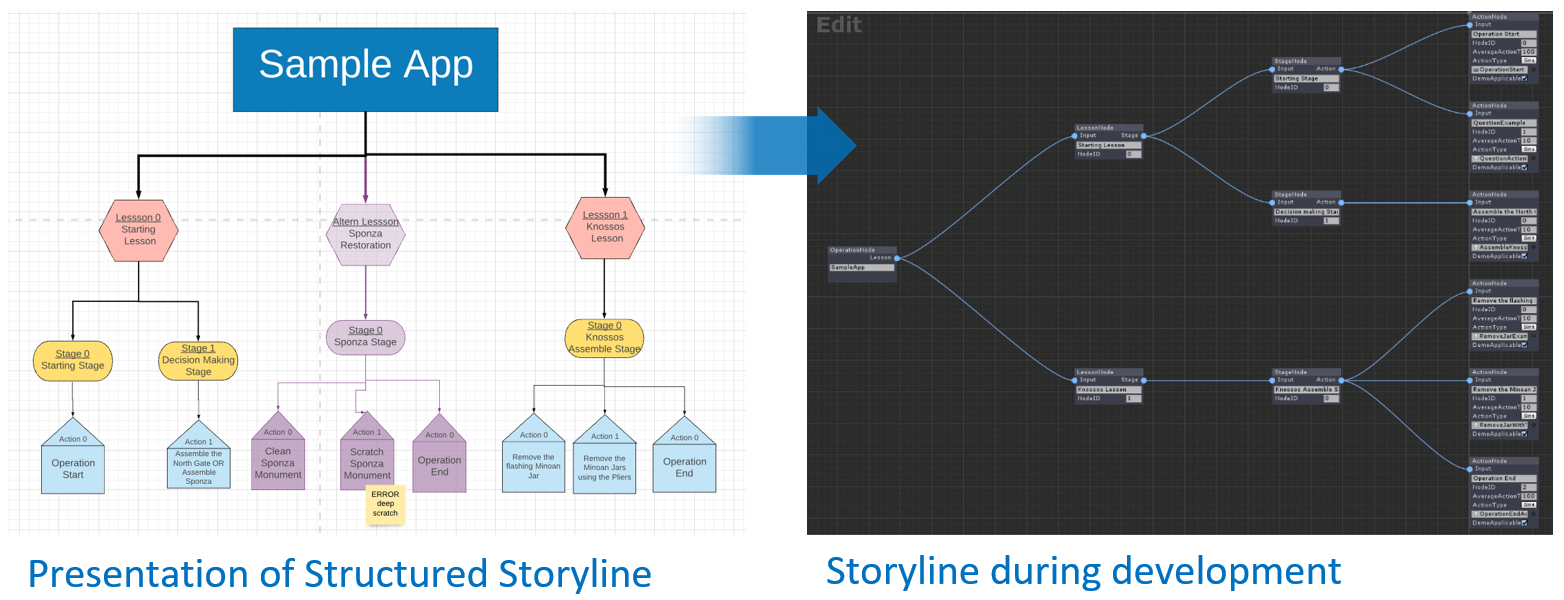
The image above shows the transformation of a structured storyline into the MAGES scenegraph tree.
Scenegraph Explained
In order to achieve a goal whether it is the restoration of a statue or a medical operation you need to follow a list of tasks/steps in a sequential order. We are referring to those steps as Actions.
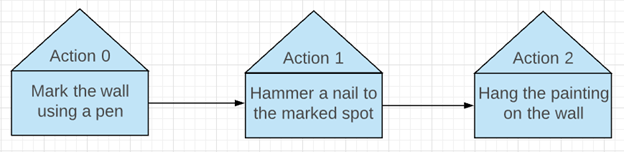
For instance, if we want to hang a painting on the wall we have to perform the following steps (Actions):
Mark the wall using a pen.
Hammer a nail at the marked spot.
Hang the painting on the wall.
Those are three steps that someone needs to complete to hang a painting on the wall. Having those steps in mind we create nodes, each one representing an Action.
However in more complex applications there are dozens of Actions, in this case a sequential representation is not very convenient. For this reason we implemented the Scenegraph architecture.
A Scenegraph is a tree with three levels of depth. The root of the tree defines the operation/process, on depth 1 we have the Lesson nodes, depth 2 the Stage nodes and finally depth 3 the Action nodes.
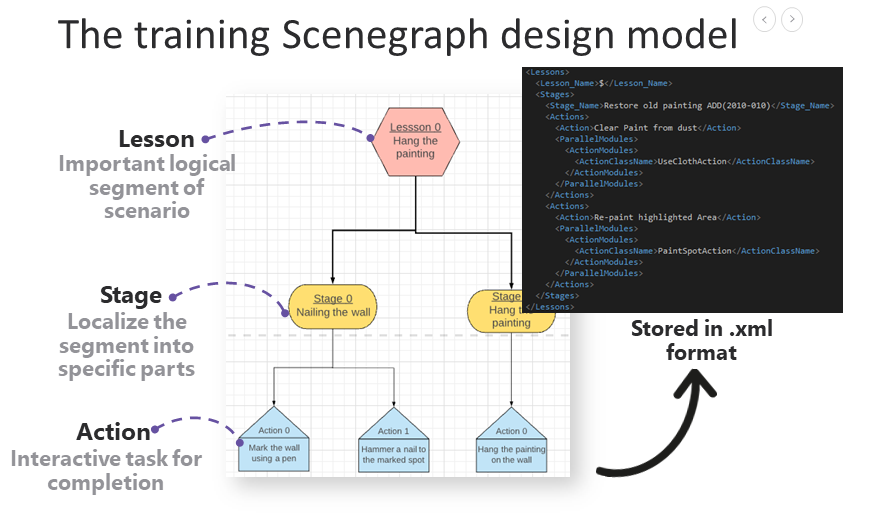
The procedure runs only on Action nodes, but we also use the other nodes in a tree format to merge parts of the simulating procedure.
For instance, we can present the above 3 Actions in a tree format as follows:
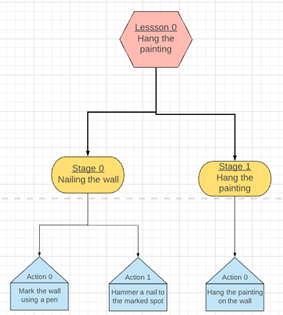
In this scenario we decided to group the first two Actions in a Stage since both of them are referring to steps that are linked with the nail. The last action can be placed alone in a stage particularly for this cause.
After those optimizations, this lesson can be used in a more complex procedure with other lessons to construct a bigger Scenegraph tree. However, pay attention that even though we have multiple types of nodes (Lesson, Stage, Actions), only the Action nodes have customizable behavior.
Note
The operation runs only on Actions, the other nodes are for traversal and scene management.
Scenegraph is implemented under the “Scene Graph” gameobject in Unity scene. This gameobject will contain the Lesson, Stages and Actions. Scenegraph will manage, perform and run all the Actions as an educational pipeline.
The Scenegraph xml file
The Scenegraph structure is saved in an .xml file An example of this xml file can be seen in Sample App (SampleApp.xml).
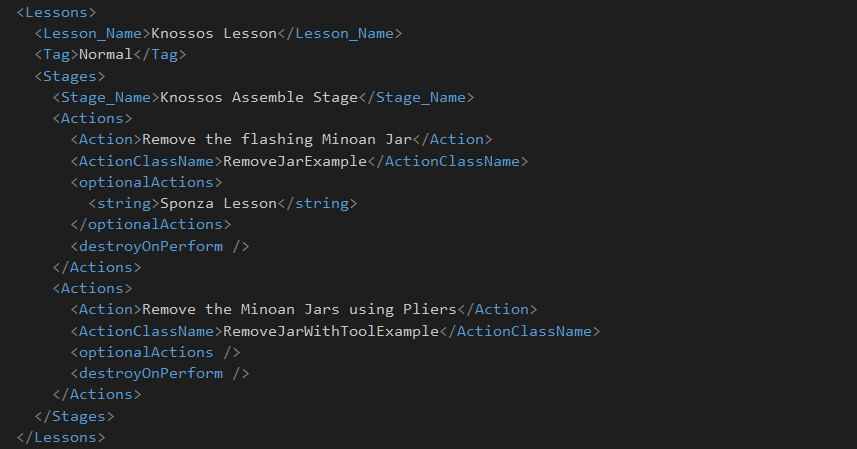
As you can see in this snippet we generate the Knossos Lesson which has one Stage and two Actions. The format of this xml needs to be as this example indicates, otherwise there will be errors in importing.
Below there is an explanation of the xml tags used in this script.
ArrayOfLessons |
Contalls all the Lessons. |
Lessons |
Contains a Lesson. |
Lesson_Name |
Name of Lesson. This string will be used to timeline UI as it will be shown to the UI button in Lesson Timeline. |
Tag |
Lesson tag. Can be either “Normal” or “Optional” |
Stages |
Contains a Stage. |
Stage_Name |
Name of Stage. This string is only used to name the gameobject and nowhere else. |
Actions |
Contains all Actions. |
Action |
Name of Action. This string needs to address in a small sentence the purpose of current Action. This string will appear on the gamification monitor (as the current Action) so in a few word needs to address the current Action (e.g. Remove the Flashing Minoan Jar). |
ActionClassName |
Contains the Class name of this Action. Each Action has an Action script that needs to be added to the Action’s gameobject Node. This script will automatically run by Scenegraph when the right time comes. In order to have a clear project we recommend storing all the Action scripts under the format LessonX/StageX/ActionX to match the Scenegraph Nodes. |
optionaActions |
Instatiates the assigned Optional Actions. In this case, the Sponza Lesson will be initialized along with this Action. |
dedstroyOnPerform |
Destroys the assigned Optional Actions when performing these Actions. In his case they are none. |
Optional Actions
Scenegraph is not just a static tree, it’s a dynamic graph. Since an educational pipeline can lead to multiple paths according to user’s actions and decisions, Scenegraph does it so. There are times in a procedure that user needs to choose between two predefined paths or an error he made leads to a completely different path.
These functionalities are implemented in such a way to support real time decision making and as a result Scenegraph can change its structure (Nodes) as the procedure goes on. Scenegraph currently supports the addition, deletion and alternation of Lessons depending on the user’s actions and decisions.
You can implement the above behavior using the Optional Actions. As mentioned on the table above, each lesson has a tag, if this tag is set to “Normal” then the Action will be spawned in the main path of the scenegraph as usual. However if this tag is set to “Optional” the Action will not spawn but wait to be spawned along with another one as Optional meaning that users can choose if they want to perform it. Those Actions may be side tasks that are not important for the operation’s main path.