Login Service
Introduction
The Login service is a fundamental pilar that complements MAGES SDK.
As briefly described in the introductory section, all traffic from and to the VR module goes through this service.
Namely, the core functionalities that Login provides are the following:
User management
User authentication & authorization
Product management & licensing system
SingleSignOn (SSO) capabilities
Essentially, Login is an identity provider and access controller.
In this section we are going to explore how you can utilize the service for your needs, starting with the basics.
First, we are going to discuss how Login is packaged into a sample application, and proceed to outline the technical details (e.g., frameworks, depending third-party libraries, etc.).
Then, we will proceed to show how you can configure the Login service, run it, and deploy it on the Azure infrastructure (Cloud provider).
Finally, we will explain how you can customize it to serve your needs.
Note
If you wish to directly run the service without going over the details and explanations scroll down to Development Environment.
Sample App
The Login service is packaged as a Visual Studio 2019 project.
In this manner, we enable developers to directly configure and customize the codebase to tailor their needs.
Besides customization to the maximum, our solution is fully transparent as to what it does under the hood with the organization acquiring it.
Furthermore, it is easier for customers to explore alternative ways of solving the problems, and perhaps extending it to fit Cloud providers of their choice.
Requirements
At its core, Login service is a full-stack .NET Core 3.1 MVC web application including a RESTful API for HTTP calls.
Therefore, it is required that you download the latest .NET Core 3.1 SDK, and update your Visual Studio to 2019 version.
Additionally, the service itself has a series of 3rd party open-source dependencies that you can install through the NuGet Package Manager through Visual Studio.
Package |
Description |
|---|---|
IdentityServer4 is responsible for OpenIDConnect and OAuth2 support, as well as identity management. |
|
MailKit is responsible for the EmailService. In other words, you can configure it to send emails to your clients such as Account Confirmation, or Reset Password functionalities. |
|
EF Core is Microsoft’s object-relational mapper, particularly useful to work with databases and treat them as .NET Objects. |
|
ASP.NET Core Identity is Microsoft’s user management package that enables user management, role, claims, tokens and everything user-related as well as a lot of out-of-the-box functionalities. |
Note
You don’t have to manually download or install required NuGet packages. Visual Studio handles this for you.
In any case, you can follow one of the methods below:
Right click on the Solution in the Solution Explorer and select Restore NuGet Packages
Right click on the Solution in the Solution Explorer and select Manage NuGet Packages for Solution…. Then, you can install them one-by-one via GUI.
Basic Configuration
Now let’s dive into the basics.
In case you haven’t already, proceed to open the Visual Studio project and load the NuGet packages.
Open the Startup.cs file, in the root project folder.
Startup.cs
Startup is perhaps the most fundamental class in an ASP.NET Core project.
In this file we configure all services via Dependency Injection (DI) that will be used at runtime.
Also, in Startup we provide configurations for 3rd party packages, routing, middlewares, authentication, etc.
Read more about App startup.
Constructor
As with any C# class, Startup starts with the constructor. Take a look at the one below:
public Startup(IWebHostEnvironment environment, IConfiguration configuration)
{
    var builder = new ConfigurationBuilder()
        .SetBasePath(environment.ContentRootPath)
        .AddJsonFile("appsettings.json", optional: true, reloadOnChange: true)
        .AddJsonFile("appsettings.Development.json", optional: true);
    builder.AddEnvironmentVariables();

    Environment = environment;
    Configuration = builder.Build();
}
In the above snippet, all we do is specify a few of the basics regarding the environment and configuration.
Based on the ASPNETCORE_ENVIRONMENT environment variable and whether its value is Development or Production
a different appSettings.json loads.
Note
The appSettings.json is responsible for runtime configurations and we explore it further down.
Configure Services
In the Configure Services function we provide the specifics for all services and the connection blocks for external ones.
More importantly, in this function we declare all services that can be injected (DI) to other modules (i.e., Controllers, Services, etc.) at run-time.
Read more about DI in ASP.NET Core here.
1 2 3 4 5 6 7 8 9 10 11 12 13 14 15 16 17 18 19 20 21 22 23 24 25 26 27 28 29 30 31 32 33 34 35 36 37 38 39 40 41 42 43 44 45 46 47 48 49 50 51 52 53 54 55 56 57 58 59 60 61 62 63 64 65 66 67 68 69 70 71 72 73 74 75 76 77 78 79 80 81 82 83 84 85 86 87 88 89 90 91 92 93 94 95 96 97 98 99 100 101 102 103 | public void ConfigureServices(IServiceCollection services)
{
string connectionString = Configuration.GetConnectionString("Identity");
var migrationsAssembly = typeof(Startup).GetTypeInfo().Assembly.GetName().Name;
services.AddControllersWithViews();
services.AddDbContext<ApplicationDbContext>(options =>
options.UseSqlServer(connectionString));
services.AddIdentity<ApplicationUser, IdentityRole>()
.AddEntityFrameworkStores<ApplicationDbContext>()
.AddDefaultTokenProviders();
services.Configure<IdentityOptions>(options =>
{
options.Lockout.MaxFailedAccessAttempts = 20;
// Password Settings.
options.Password.RequireNonAlphanumeric = false;
options.Password.RequireDigit = false;
options.Password.RequireUppercase = false;
// Email Settings.
options.User.RequireUniqueEmail = true;
// SignIn Settings.
options.SignIn.RequireConfirmedEmail = true;
});
services.Configure<CookiePolicyOptions>(options =>
{
options.MinimumSameSitePolicy = SameSiteMode.Unspecified;
options.Secure = CookieSecurePolicy.SameAsRequest;
});
var builder = services.AddIdentityServer(options =>
{
options.Events.RaiseErrorEvents = true;
options.Events.RaiseInformationEvents = true;
options.Events.RaiseFailureEvents = true;
options.Events.RaiseSuccessEvents = true;
// see https://identityserver4.readthedocs.io/en/latest/topics/resources.html
options.EmitStaticAudienceClaim = true;
})
.AddConfigurationStore(options =>
{
options.ConfigureDbContext = b =>
{
b.UseSqlServer(connectionString, m =>
m.MigrationsAssembly(migrationsAssembly));
};
})
.AddOperationalStore(options =>
{
options.ConfigureDbContext = b =>
{
b.UseSqlServer(connectionString, m =>
m.MigrationsAssembly(migrationsAssembly));
};
})
.AddAspNetIdentity<ApplicationUser>();
builder.AddDeveloperSigningCredential();
services.AddAuthentication()
.AddGoogle(options =>
{
options.SignInScheme = IdentityServerConstants.ExternalCookieAuthenticationScheme;
options.Scope.Add("email");
options.ClientId = "Your Client Id";
options.ClientSecret = "Your Secret";
});
services.AddLocalApiAuthentication();
services.AddAuthorization(options =>
{
options.AddPolicy("Admin", policy =>
{
policy.RequireAuthenticatedUser();
policy.RequireClaim("role", "Admin");
});
options.AddPolicy("Supervisor", policy => {
policy.RequireAuthenticatedUser();
policy.RequireClaim("role", "Supervisor");
});
options.AddPolicy("User", policy =>
{
policy.RequireAuthenticatedUser();
policy.RequireClaim("role", "User");
});
});
services.AddHostedService<BackgroundCheckoutService>();
services.AddScoped<IProfileService, ProfileService>();
services.AddScoped<LicenseValidationService>();
services.AddSingleton<IEmailConfiguration>(Configuration.GetSection("EmailConfiguration").Get<EmailConfiguration>());
services.AddTransient<IEmailService, EmailService>();
services.AddMvc(option => option.EnableEndpointRouting = false)
.SetCompatibilityVersion(CompatibilityVersion.Version_3_0)
.AddNewtonsoftJson(opt => opt.SerializerSettings.ReferenceLoopHandling = ReferenceLoopHandling.Ignore);
}
|
Let’s take a look at the important bits on a configuration-basis.
DbConfiguration
Between lines 8-9 we specify the Database Context (i.e., ApplicationDbContext) that points to our SqlServer.
For this we need the connection string, whether it is a local database or a database on Azure, that we obtain from the AppSettings.json file in line 3
We use the same database for the Configuration and Operational store required by IdentityServer4 as shown between lines 44-60.
Identity & IdentityServer4
For user management we will be using ASP.NET Identity which provides out-of-the-box a user management store, a signin manager, role-based authorization, and more.
First, we proceed to include and configure ASP.NET Identity to our project in lines 11-13.
Then, we need to specify the user class model that represents our final users. This is the ApplicationUser model included under the Models/ directory.
See how ApplicationUser extends the original IdentityUser and introduces more properties that we want to keep track of.
For instance, the Country of origin for the user, and the Tenant (i.e., Organization) the user belongs to.
In addition, we have to specify the database that will store our users. In this case, this the ApplicationDbContext SQL database we configured in the previous paragraph.
Further down, between lines 15 and 26 we specify some Identity options for user management.
For example, we specify that each user should have a unique email address (prevents duplication of user accounts on an email basis), and that we do not require any special characters in the password (consider altering this to prevent users from using weak passwords).
In lines lines 34-61 we proceed to add IdentityServer4 to our services.
There we specify the Configuration and Operational store, which is the same database in practice,
and more importantly we specify that IdentityServer4 will support out-of-the-box AspNetIdentity and the ApplicationUser we declared earlier on.
Role-based Authorization
Role-based authorization is an important part of user management.
Essentially, we provide different level of access scopes to different users based on their associated roles. AspNetIdentity supports role-based authorization out-of-the-box.
That being said, in lines 76-92 we define three different policies.
Admin
Supervisor
User
Role-based access works in an inclusive and not in an exclusive manner.
In other words, an Admin has also the roles of Supervisor and User. A supervisor, has also the role of User. And finally, the User only contains User.
This means that Admins can access all available functionality – scope-wise, whilst the other two are restricted.
For example, deleting a user through an API call is only available if the user who invokes the API call has the role of an Admin. Therefore, this functionality is Unauthorized (401) for Supervisors and Users.
SingleSignOn (SSO)
As an example for SSO support, we provide the snippet between lines 67-72.
There you need to fill in the ClientId and ClientSecret that you obtained from Google, to enable access to users
to your service through their Google accounts.
Note
There is also support for other services, but you will have to configure that manually.
Read more about it at Google.
Services
Finally, we have to declare our own custom services in a similar manner to provide DI support at runtime. In this manner we also configure the lifetime per service.
In particular, between lines 94-98 we configure the services found under /Services directory.
Pay attention to how services have different lifetimes depending on the declaration.
For instance, the EmailConfiguration is declared as a Singleton and the lifetime is the same as the application and wherever it is injected, e.g., in some controller, the same object is injected.
On the other hand, the EmailService itself is declared as a transient. This means that wherever EmailService is injected throughout an HTTP request, EmailService will be reinstantiated for this exact declaration. Finally, scoped services live throughtout a single HTTP request.
Configure
The Configure method specifies the request pipeline, in other words, the middlewares involved whenever a request reaches the application.
In the snippet below we specify a typical Configure method:
public void Configure(IApplicationBuilder app)
{
    app.UseCookiePolicy(new CookiePolicyOptions {
        MinimumSameSitePolicy = SameSiteMode.None
    });

    app.UseCors(options =>
    {
        options.AllowAnyOrigin();
        options.AllowAnyHeader();
        options.AllowAnyMethod();
    });

    if (Environment.IsDevelopment())
    {
        app.UseDeveloperExceptionPage();
        app.UseDatabaseErrorPage();
    }

    app.UseStaticFiles();

    app.UseRouting();
    app.UseIdentityServer();
    app.UseAuthorization();
    app.UseEndpoints(endpoints =>
    {
        endpoints.MapDefaultControllerRoute();
    });
}
The code in the snippet is pretty much self-explanatory, we the only difference that the order middlewares are specified in the request pipeline matters.
For instance, app.UseEndpoints function is typically the last one to be declared after authorization, routing, and the rest of the middlewares have been set to ensure traffic
goes to specified controllers.
Read more about the Configure method.
MVC
MVC ASP.NET Core applications are based on the Model-View-Controller pattern, which is perhaps the easiest and most fundamental pattern involving UI, data-layers, and business logic under one unified application.
The Login service effectively utilizes this pattern, and specifically for login flows and operations that have to be done on-site.
For example, the common Login page where users log into the service is part of the MVC with the structure:
Models are under
Controllers/Account/*Controller is under
Controllers/Account/AccountController.csViews are under
Views/Account/*
You can observe that the AccountController supports more than one functionality, and as the name suggests, operations that naturally are associated with Users and their accounts.
For instance, through the AccountController we support the following functionalities:
User Login
User Registration
Forgot Password
Reset Password
etc.
While each of these operations are bundled for efficiency under a single Controller, almost everyone necessitates a different View. The same holds true for the Models.
Note
The AccountsController inherits from the base class Controller.
Controller
Routing
Routing for an MVC Controller, unless explicitly specified, inherits the controller’s name.
For example, if your service is running at http://localhost:5002, then AccountController routes at:
http://localhost:5002/Account
In addition, routing to a specified Action (i.e., public Controller functions that represent HTTP requests), unless explicitly specified, is as follows:
http://localhost:5002/Account/{ActionName}
For instance, to navigate to the Login page you need to enter the following endpoint at your browser:
http://localhost:5002/Account/Login
HTTP Methods
Moreover, HTTP verbs are defined as attribute on top of Actions.
As an example, take the Login Action below:
[HttpGet]
public async Task<IActionResult> Login(string returnUrl)
{
    var vm = await BuildLoginViewModelAsync(returnUrl);
    if (vm.IsExternalLoginOnly)
    {
        return RedirectToAction("Challenge", "External", new { scheme = vm.ExternalLoginScheme, returnUrl });
    }

    return View(vm);
}
See that the specified Action is declared as a GET method, and will return its associated View (i.e., Login.cshtml).
On the other hand, we can also proceed to specify the POST Login method in a similar manner:
[HttpPost]
[ValidateAntiForgeryToken]
public async Task<IActionResult> Login(LoginInputModel model, string button)
{
    // Some code that actually handles the LoginInputModel and logs in a User.
}
Note
Notice that both Actions have the same name and return types, only Action parameters change.
Therefore, a typical flow would normally start from the GET Login at the browser, where the Login screen is returned to the User, and finish when the user enters his credentials at the displayed form, which will be posted at the POST Login Action.
Authorization
Level of access can be declared for the whole Controller, or can be added on a per-action basis. Typically you can mix and match policies inside the Controller, according to your needs.
In the AccountController above, there is no globally defined level of access. Therefore, Actions such as Login and Register inherit by default the [AllowAnonymous] attribute
and can be accessed through unauthenticated Users, which makes sense.
On the other hand, Actions as is the ChangePassword are allowed only for logged in Users who have at least the role "User" in their claims.
See the example below:
[HttpGet]
[Route("account/password")]
[Authorize(Roles = "User")]
public IActionResult ChangePassword(string returnUrl = null)
{
    return View();
}
Note
Observe also how this particular Action has a different routing defined and is accessible at /account/password.
Model & View
In the code snippet above that involves the POST login Action, notice how the specified input model is provided as a parameter.
Further, take a look at the associated login View below:
@model LoginViewModel

<div class="login-page">
    <!-- rest of the elements -->

    <!-- FORM -->
    <form asp-route="Login">
        <input type="hidden" asp-for="ReturnUrl" />
        <div class="form-group">
            <label asp-for="Username"></label>
            <input class="form-control" placeholder="Username" asp-for="Username" autofocus>
        </div>
        <div class="form-group">
            <label asp-for="Password"></label>
            <input type="password" class="form-control" placeholder="Password" asp-for="Password" autocomplete="off">
        </div>
        @if (Model.AllowRememberLogin)
        {
            <div class="form-group">
                <div class="form-check">
                    <input class="form-check-input" asp-for="RememberLogin">
                    <label class="form-check-label" asp-for="RememberLogin">
                        Remember My Login
                    </label>
                </div>
            </div>
        }
        <div class="row mt-4">
            <div class="col-md-12 mb-3 text-center">
                <button class="google-button" name="button" value="login">
                    <span class="google-button__icon">
                        <img src="~/VR.png" class="oramavr-button-icon" />
                    </span>
                    <span class="google-button__text oramavr-button">Sign in with ORamaVR</span>
                </button>
            </div>
        </div>
    </form>
</div>
Let’s focus on the important bits.
First, notice how the linked model LoginViewModel is declared on the top of the page.
Second, notice how the form is associated with the asp-route="Login" action.
Finally, each form-control input is associated with the appropriate property of our data model.
API Controllers
On the other hand, we have the ApiControllers to provide an HTTP RESTful API for User and Product management through the Portal.
ApiControllers are under /Controllers/API/* directory.
The main difference is of course that an ApiController is not associated with any View, and does not serve HTML pages to users, but rather HTTP Responses.
In terms of code, here is a following example from the UsersController:
[Route("api/[controller]")]
[ApiController]
[Authorize(IdentityServerConstants.LocalApi.AuthenticationScheme)]
public class UsersController : ControllerBase
{
    private readonly ApplicationDbContext _context;
    private readonly UserManager<ApplicationUser> _userManager;
    private readonly RoleManager<IdentityRole> _roleManager;


    public UsersController(
        ApplicationDbContext context,
        UserManager<ApplicationUser> userManager,
        RoleManager<IdentityRole> roleManager)
    {
        _context = context;
        _userManager = userManager;
        _roleManager = roleManager;
    }

    // ----------------------------------------------------------- GET -----------------------------------------------------------
    [HttpGet]
    [Authorize(Policy = "Admin")]
    public async Task<IActionResult> Get()
    {
        var users = await _userManager.Users.ToListAsync();
        if (users == null)
        {
            return NotFound();
        }

        return Ok(users);
    }

    // Rest is omitted for simplicity
}
Compared to MVC
The first few obvious differences regarding UsersController are the following:
Routing is explicitly specified at
/api/Usersto differentiate from MVC Controllers.The
[ApiController]attribute is utilized that provides certain features.And the
[Authorize(IdentityServerConstants.LocalApi.AuthenticationScheme)]is also utilized to ensure Clients who make API calls have the registered scoped.The controller itself inherits from
ControllerBasethis time.
Apart from those differences, let’s take a look at the first GET functionality which returns all Users to the caller.
First, in this controller you can make sense of the DI pattern we discussed earlier.
In detail observe how :code`ApplicationDbContext, UserManager, RoleManager` are injected into the Constructor of the UsersController for use throughout the application.
Then, take a look at the specific GET call.
In this case, we have specifically declared that this is an HTTP GET call through the use of the [HttpGet] attribute.
Moreover, we have restricted access to Admins only through the [Authorize(Policy = "Admin"] attribute.
Note
We have not defined any explicit routing for this method. Therefore, requests fired at http://{service}/api/Users will invoke this method.
If the User is not authorized to do so, an HTTP 401 Unauthorized response will return to the client.
What it does
Essentially, the Get() call querys the database and returns a list of all ApplicationUser users.
In this case, we could have also used the ApplicationDbContext => _context to query the database, but we prefer to utilize
the UserManager API provided by AspNet.Identity for user related operations.
Now, if users are null, an HTTP 404 NotFound response is sent back to the client.
In all other cases, an HTTP 200 Ok response with the list of users is returned.
Note
You can access and actively test all available API calls through Postman Client. But remember to authorize yourself first.
Database Migrations
Introduction
We utilize Entity Framework Core (EF Core) as an object-relational mapper (O/RM).
This enables us to work directly with .NET objects that relate directly to our database tables and the underlying schema.
EF Core has two ways of managing the database schema.
In our case we utilize the code-first approach and work with Data Migrations to keep the database up-to-date.
Simply speaking, if we add a new property to the ApplicationUser we can add a new migration to that will update the database table accordingly.
The Login service has already certain migrations for your needs that correspond to all models found in the database.
Current database models correspond to the ones under Models/* directory and have certain attributes that define relationships between other objects.
In addition, certain relationships have to be defined at the ApplicationDbContext with the OnModelCreating method, as attributes do not cover more complex relationships.
Add New Migration
You can add a new migration through the NuGet Package Manager console simply as follows:
Add-Migration {MigrationName} -Context ApplicationDbContext -OutputDir "/Migrations/ApplicationDb/"
Moreover, if the above command builds successfully, you can proceed to update the database with the following command:
Update-Database
You can also skip this step and read the next section.
Existing Data and Applying Migrations
For convience and ease of use, we provide certain data that will be applied the first time you run the Login Servive.
The code will also ensure that the database is created and all migrations are applied.
This code lies onto the Program.cs file under the root project directory.
Particularly, this code is inside the Main method and will be invoked as soon as you start running the service and access one of the endpoints or
do an API call.
Responsible for this is the helper class is SeedDataHelper under Helpers/* directory.
The helper class will make sure to add certain dummy users and organizations, as well as a few products and link them with the tenants.
More importantly, it will create all necessary Clients, ApiResources and Scopes required for IdentityServer4 and the services (AnalyticsAPI, Portal, VR module) to communicate.
The initial data for IdentityServer4 resources are under Config.cs.
Danger
It is strongly suggested that you alter the ClientSecrets for each Client, especially in Production database.
Getting Ready for Development
Assuming you read the previous sections and obtained a basic understanding of how everything works, in this section we will provide all necessary configurations you have to follow before you start play-testing around the Login service.
1. Local SQL Database
First you need to create a local SQL Database.
The easiest way to do so is with SQL Server Express LocalDB. There are two options to install LocalDB onto your machine.
One is to download and install separately from the link above.
Through Visual Studio Installer as described in Installation Media.
Then, you can manage the SQL Connection to the LocalDB through Visual Studio 2019.
To do so, click on the top toolbar View and then click on Sql Server Object Explorer.
This will open a panel as follows:
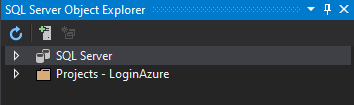
On the top bar click on the Add SQL Server button and add select from the Local list the LocalDB SQL Server as in the figure below:
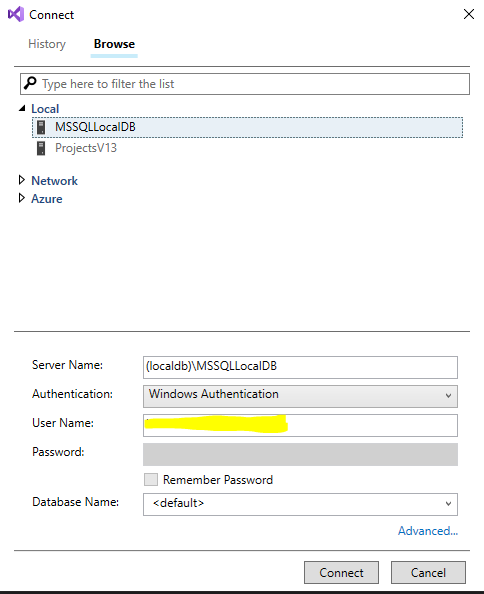
Click connect and proceed to expand the SQL Server tree structure on the SQL Server Object Explorer as follows:

Right click on the Databases icon and select the Add New Database option.

Give a descriptive name for your Database (something like IdentityDb) and click Ok.
Now you have created your Database but it is empty. Don’t worry we will populate it soon, keep reading!
2. App Settings
DB Connection String
After the database is set you need to obtain the connection string.
The easiest to obtain the connection string is through the SQL Server Object Explorer.
Click on the database, and then on the Properties window you will find the Connection String as in the figure below.
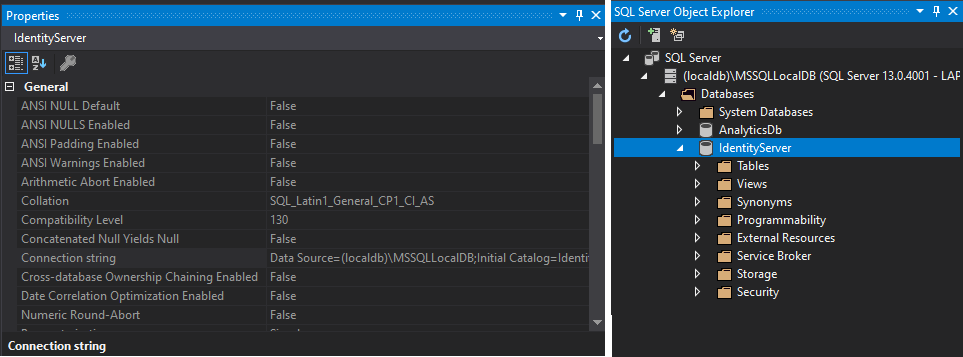
Proceed to open the file appSettings.Development.json and paste it inside the Connection Strings/Identity as in the example snippet below:
"ConnectionStrings": {
    "Identity": "Server=(localdb)\\mssqllocaldb;Database=IdentityServer;Trusted_Connection=True;MultipleActiveResultSets=true"
}
Email Configuration
While in the appSettings.Development.json file, proceed to also include the configuration for your EmailService.
This is needed for user account operations that necessitate sending an email to the User.
For instance, forgot password functionality.
"EmailConfiguration": {
  "SmtpServer": "",
  "SmtpPort": 587,
  "SmtpUsername": "",
  "SmtpPassword": "",
  "PopServer": "",
  "PopPort": 995,
  "PopUsername": "",
  "PopPassword": ""
}
If you need to configure extra TLS or other security options, you can do so in the EmailService.cs file under Services/ directory.
Optional Step. You can configure the email from, subject, and content fields in the AccountController and UsersController, where the EmailService is invoked and Emails are sent.
3. (HTTPS) Self-signed Certificate
Now that all configurations are set, we need to set a self-signed developer certificate before running our service.
This is because IdentityServer4 by default prompts to encrypted traffic (HTTPS) and in production won’t work otherwise.
So for development purposes, Visual Studio and IIS will generate a self-signed certificate for us.
First, right-click on the Project and click on the Properties option.
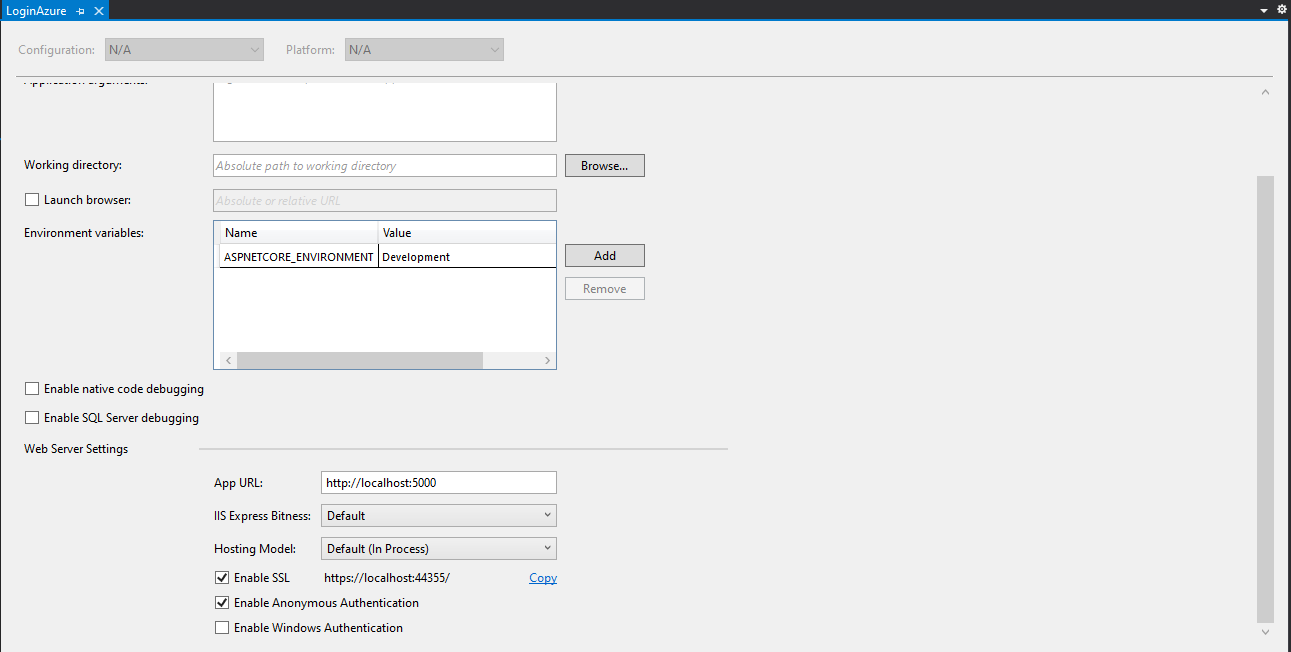
Scroll down and make sure the Enable SSL checkbox is ticked! If it is not, check it.
Note
This is also the default development environment endpoint to access the service https://localhost:44355.
When you check it for the first time, a window prompt will appear asking you to create a self-signed certificate that will be stored on your computer.
Click Agree on all dialogs, and you are set!
4. Start the Service
Assuming you followed all previous steps successfully and everything is set, you are ready to hit the start button.
Note
Make sure IIS profile is selected and that Debug mode is set on the top bar.
Hitting the Start button will fire up Login service at the specified endpoint in Step 3.
https://localhost:44355
When you point your browser the first time at this URL, it might be a bit slower than expected. This happens mainly due to two reasons:
ASP.NET Core slow-start
The SeedDataHelper.cs script will be invoked and subsequently:
2.1. Will ensure all Tables are initialized.
2.2. Migrations are applied.
2.3. First dummy data will be inserted to the database.
After this cold start you will be navigated to the Login page. Login with one of the predifined users at SeedDataHelper.cs and then you can go back to the Home page and see the default page of IdentityServer4 which is useful for debugging user claims, etc.
Note
The Default HomePage of IdentityServer4 is only for the development environment. This page will not be visible when you deploy to Azure.
If everything went fine at this point, you are set. Most likely you won’t experience any strange behaviors.
Note
Make sure you test thoroughly all supported functionality (e.g., registration page, forgot password, etc.).
Getting Ready for Production
Assuming you followed all steps in the previous section, and everything is working perfect locally, it’s about time to deploy.
Below we outline all necessary steps and precautions before you do so.
Warning
The deployment environment is configured for Azure Cloud provider.
1. App Settings
If you recall from the previous section, we modified the appSettings.Development.json file for working locally.
This time, we will have to modify in the same manner appSettings.json for use in the deployment.
As before, proceed to insert Database connection string in the ConnectionStrings: Identity, this time with the connection string
from the live database in Azure.
Note
(Optional), You can download SQL Server Management Studio (SSMS) to actively monitor your databases and input data.