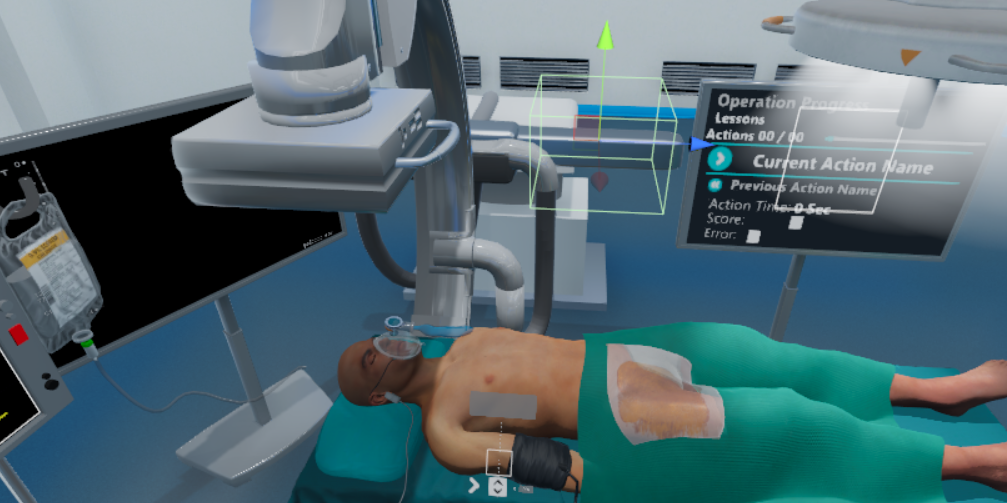
Action Analytics
In this tutorial we will demonstrate the different types of our analytics errors/warnings and how to properly configure them for your Actions.
In MAGES SDK we provide a number of standard scoring factors to enhance your Analytics.
Note
Scoring factors refer to specific actionable behaviors which are important to consider for each Action, and they reflect the user scoring e.g. correct orientation, wrong collision, max velocity etc.
How to add scoring factors to your Action
Open the scenegraph editor from MAGES > Scenegraph Editor and load your scenegraph.
Each Action node has an Analytics button, click it to open the analytics editor.
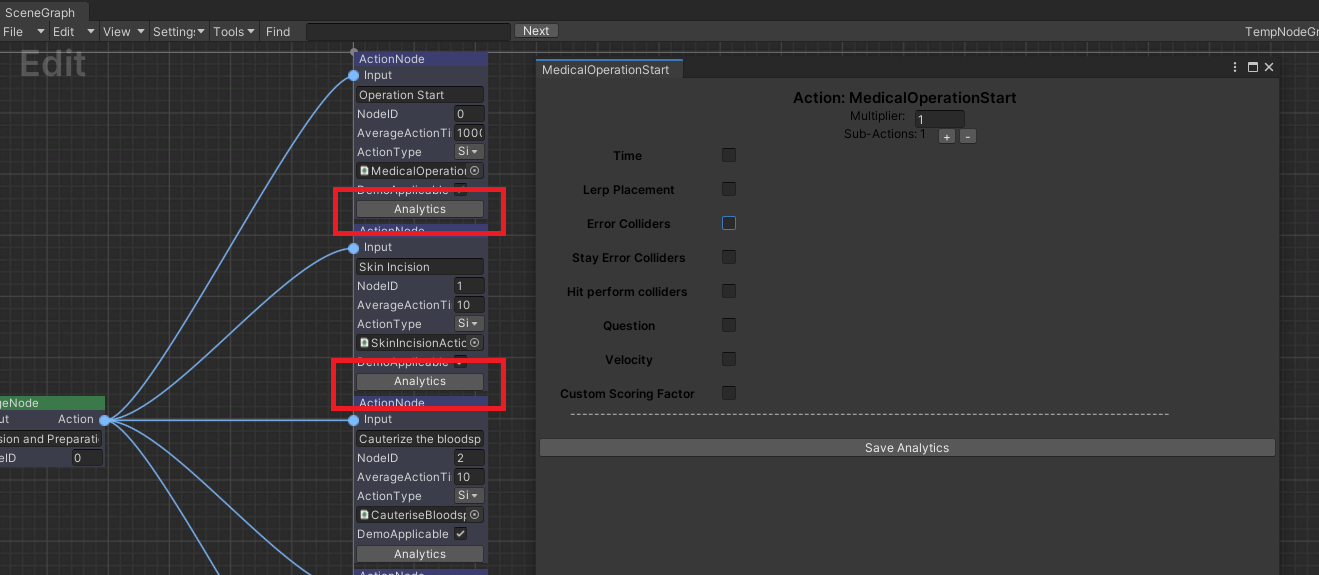
This window contains the scoring factors. To enable a new scoring factor click the corresponding checkbox. To save your changes click the Save Analytic button. This will generate the analytics file for your Action.
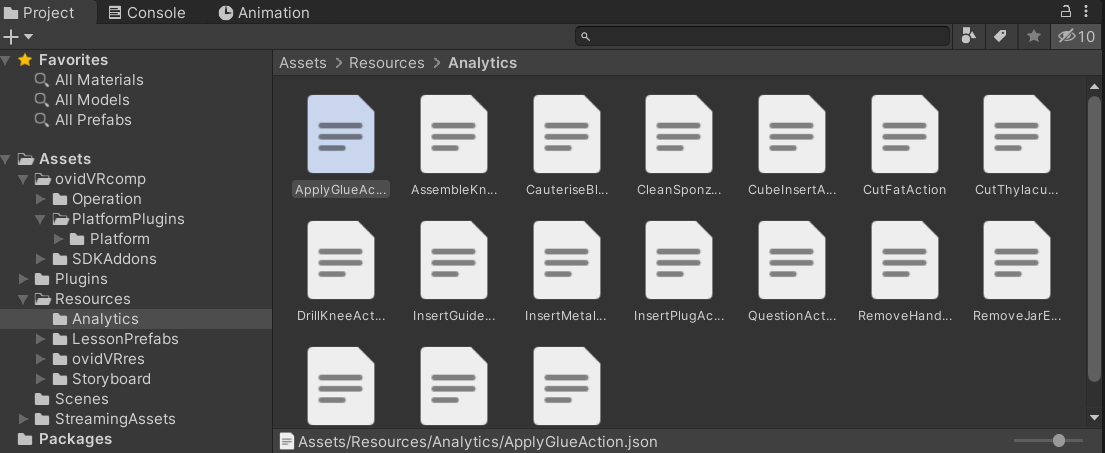
Below you can see the analytic files of our Actions. They are saved in Assets/Resources/Analytics/.
The Analytics Editor
This is an example of the analytics editor.

Note
The scoring system is calculated in 100. The maximum score of an Action is 100 and the minimum 0.
Multiplier: At the top of the window you can see a multiplier value. This can be used in case you want to multiply with a given number the score of the Action.
Sub-Actions: To add a second sub-Action in combined Actions use the “+” and “-” buttons.
Importance: This value identifies the weight of the scoring factor.
VeryLittle: 15%
Little: 30%
Neutral: 50%
Big: 80%
VeryBig: 100%
If our Action has only a Little scoring factor then its maximum score will be 30/100.
If we configure a Neutral and a VeryLittle scoring factor within the same Action, the maximum score will be 65/100.
Note
The score is capped at 100.
If our scoring factors overpass 100 e.g. three Neutral scoring factors it will be capped at 100.
Error Type: We support three different types of errors with different popup UIs for each case:
Warning
Error
CriticalError
Error Message: From the dropdown menu add the corresponding UI key containing text to inform the user.
Show UI: Boolean value to toggle the error message.
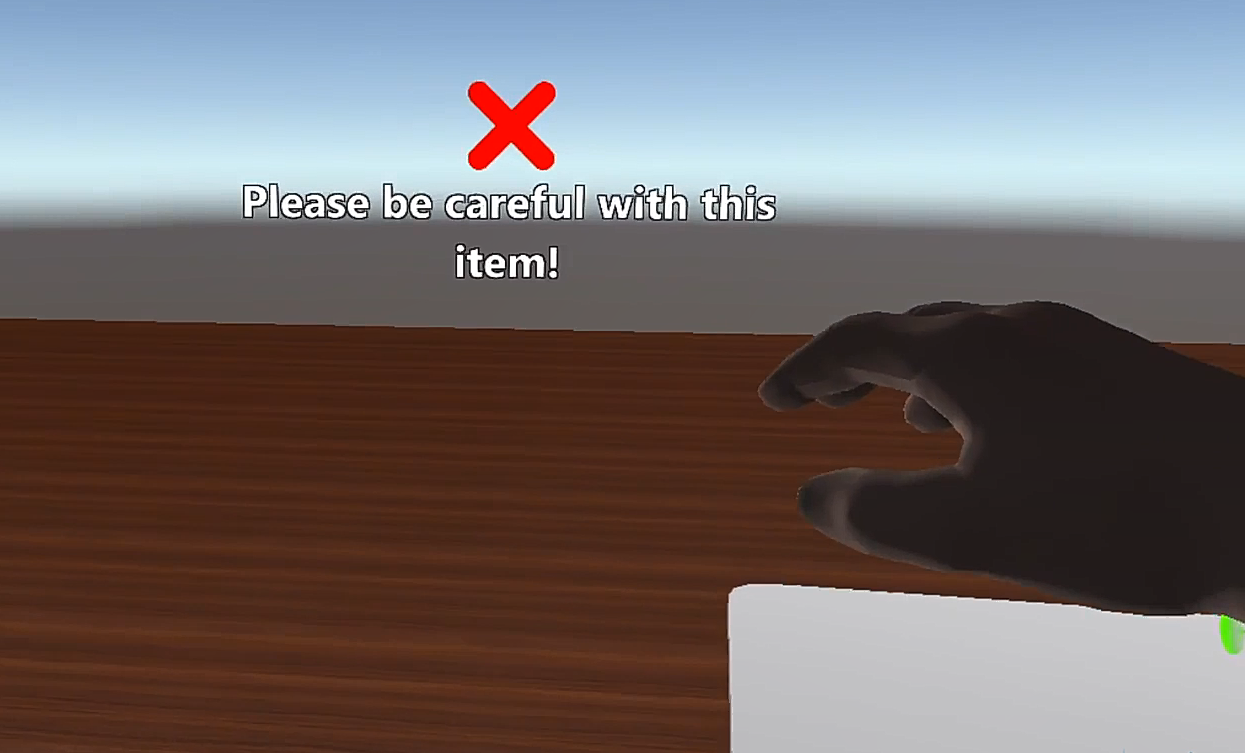
Example of an error message:
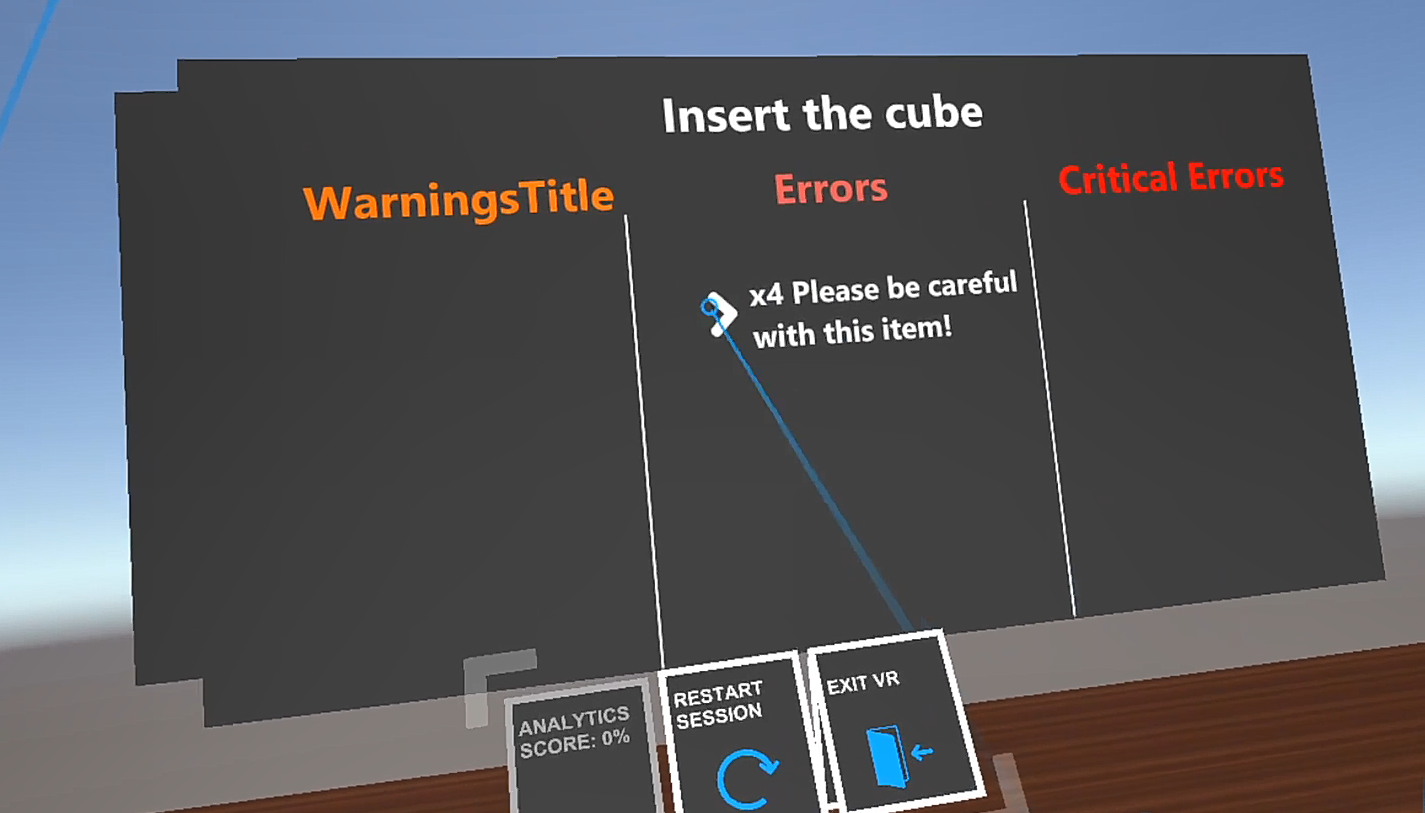
Be aware that errors, warnings and critical errors are also presented in the analytics overview at the end of the operation:
Below we present the standard scoring factors with examples on how to use them to rate your users.
Scoring factors:
Time
Usage: Give points according to the completion time. To achieve the highest score user needs to complete the Action in fewer seconds that the Completion Time. Passing this time-limit results in points loss (10 points per second).
Example: In this example we give user 30 seconds to complete the Action,
Here is the analytics editor for this Action:
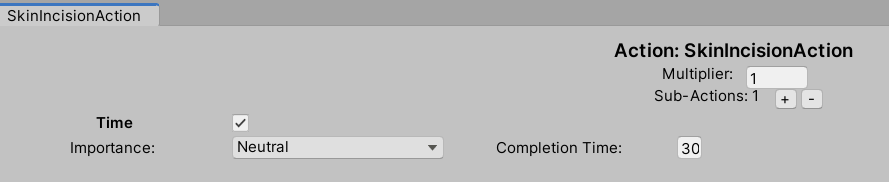
We set the Completion Time to 30 seconds.
We also set the Importance to Neutral meaning that this scoring factor will give 50/100 points to the user. If this is the only scoring factor the user can achieve the highest score of 50/100.
Lerp Placement
Usage: Track the correct orientation when inserting an object (InsertAction).
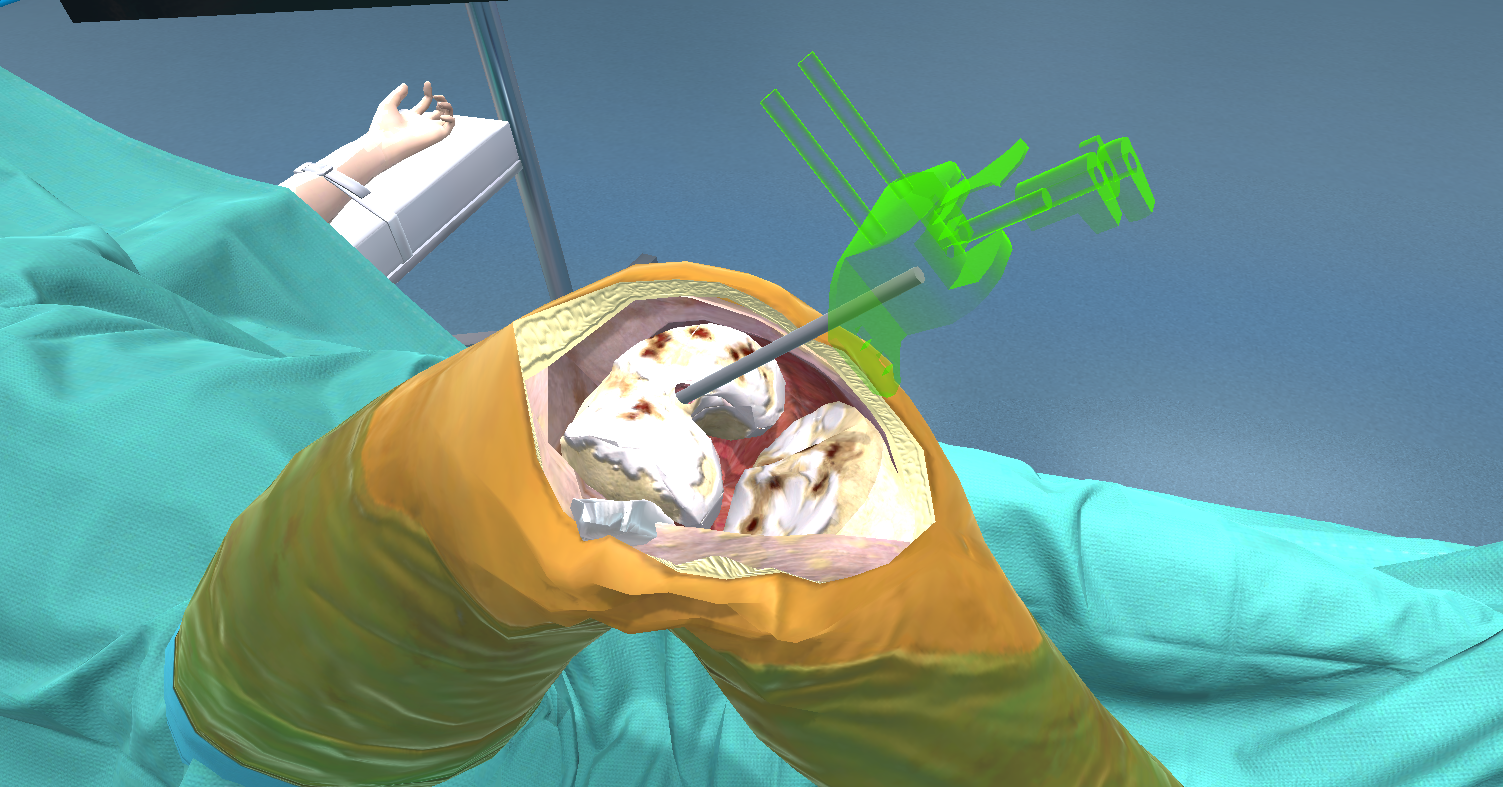
Example: In this example, we configure a 10 angles tolerance when inserting the alignment guide to its final position.
Here is the holographic alignment guide:
Below you can see the analytics editor for this Action:

We drag and drop the final prefab into the Final Prefab 0 input field
Importance to Neutral. This factor is valued 50/100.
We set the Scoring Angle to 10 degrees
Below you can see the PrefabLerpPlacement component, attached on our final prefab. The max angle difference value sets the maximum number of degrees for this insertion.
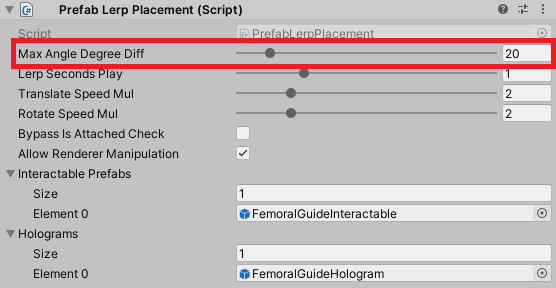
Note
User will be awarded with full score when inserting the object with angle less than: max angle difference value (angle from the final placement) - Scoring Angle.
In our example 20-10 = 10 degrees. With up to 10 degrees difference, the user will get full score.
Error Colliders
Usage: Track if an object is in contact with a collider.
Example: In this example we set two error colliders to track if the user drops a tool on the floor, and the other one if the scalpel cuts the skin in wrong position.
Below you can see the analytics editor for this Action:
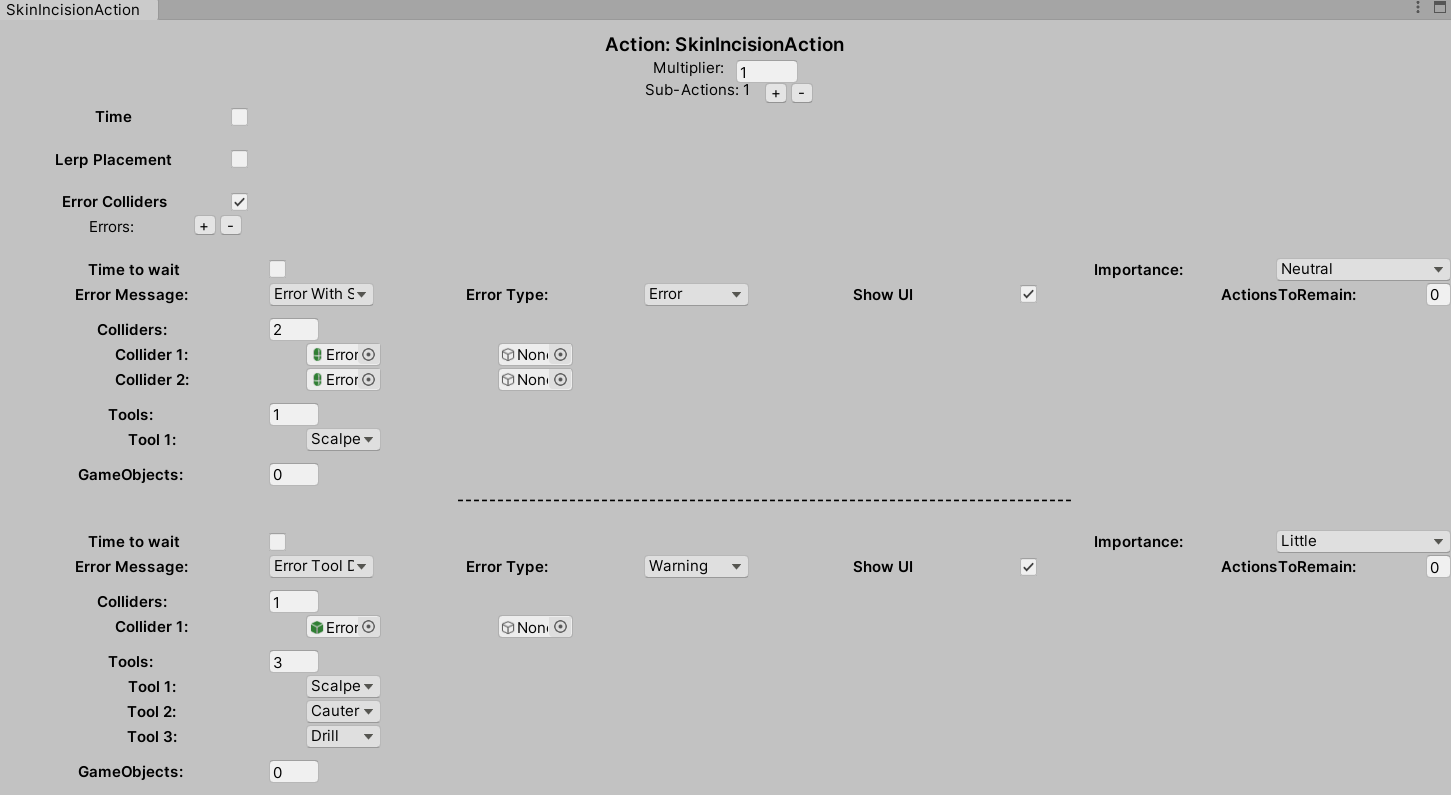
The first error collider item contains two error colliders: one for the femur and one for the tibia. You can see them below:
We drag and drop both error colliders to the Collider 1 and Collider 2 input fields. This reference will spawn both colliders
We select the Scalpel from the corresponding Tools dropdown
We set the Error Type as an Error
We set the Error Message to our custom message key from the dropdown
ShowUI is enabled
The second error collider item an error collider for the floor.
We drag and drop the error collider to the Collider 1 input field to spawn the collider.
We set the Error Type as a Warning
We set the Error Message to our custom message key from the dropdown
ShowUI is enabled
We select all the available tools from the corresponding Tools dropdown
Note
Check the Time to wait option and insert the time in seconds the object should stay in contact with the collider to trigger the error.
Stay Error Colliders
Usage: Track if an object is not in contact with a collider
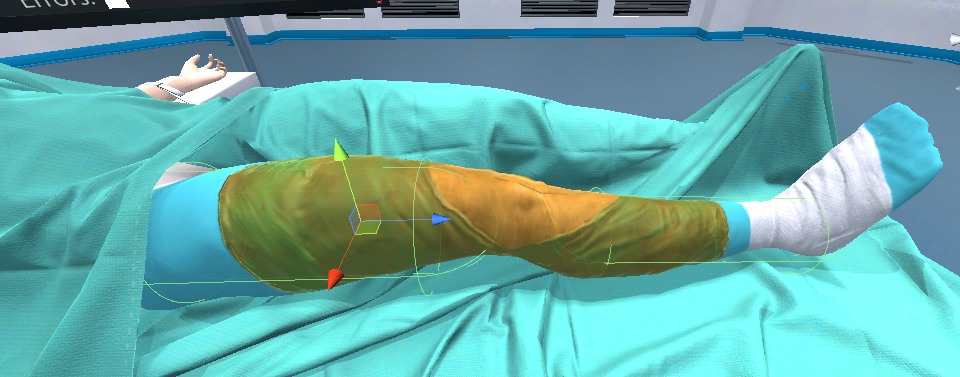
Example: In this example we set an error collider to track if the user exposes the cautery to contamination. If the cautery exits the collider, the user will lose points.
You can see the error collider here (reflecting the safe area):
Here is the analytics editor for our Action:
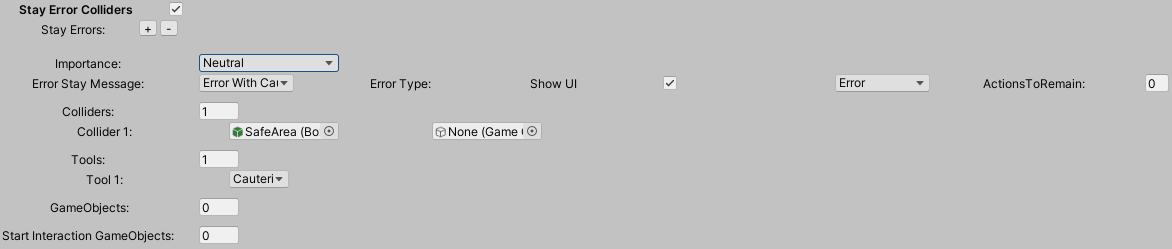
We drag and drop the collider representing the safe area into Collider 1. This will spawn the safe area collider.
We select the Cautery from the Tools dropdown
We set the Error Type as an Error
Importance to Neutral. This factor is valued 50/100.
We set the Error Stay Message to our custom message key from the dropdown
ShowUI is enabled
Hit Perform Colliders
Usage: Users should interact with a collider/object before completing the Action.
Example: In this example, the user needs to answer a question about the correct placement of a vein catheter. However, to answer correctly, the user should perform an x-ray prior to that. To track if the user conducted the x-ray we spawn a collider next to the radiographer to trigger when running the x-ray.
Below you can see the collider (right) and the radiographer (left). The user will drag the radiographer from its handle and eventually hit our collider. In this way we are sure the radiographer was used properly.
Below you can see the analytics editor for this Action:

We set the Importance to VeryBig, in this way a correct answer will give 100 points and a wrong answer 0.
We drag and drop the radiographer prefab into the Collider 1 input field.
We drag and drop the radiographer collider (cube) into the GameObject input field. In this way the collider will be spawned.
We set the Error Message to our custom message key from the dropdown
Spawns Error is enabled
We set the Type of Error to Error from the dropdown
Question
Usage: Lose points when answering a question incorrectly.
Example: In this example we will set the scoring factor to affect 100% of the score. Meaning that if the user answers wrong it will get zero points.
Below you can see the analytics editor for this Action:

We set the Importance to VeryBig, in this way a correct answer will give 100 points and a wrong answer 0.
We drag and drop the question prefab to the corresponding object field next the Importance.
We set the Error Message to our custom message key from the dropdown
Spawns Error is enabled
We set the Type of Error to Error from the dropdown
Velocity
Usage: Track the velocity of an object. Lose points when the velocity overpasses the configured value.
Example: In this example we will set a velocity scoring factor on a fragile object since we don’t want the user to grab it and move it very fast.
Below you can see the analytics editor for this Action:

We set the Importance to Big, in this way the Action will get a perfect score of 80/100
We drag and drop our fragile object to the Interactable Prefab input field
We set the Velocity value to 2.7. If the velocity of the object overpasses 2.7 the user will lose 80 points.
We set the Error Message to our custom message key from the dropdown
Spawns Error is enabled
We set the Type of Error to Warning from the dropdown
Custom Scoring Factor
Usage: Configure your own custom scoring factors if you need something special, not provided out-of-the-box.
Example: In this example, we set a custom scoring factor to measure the velocity on impact when hammering the Knossos building. User needs to take the mallet and hit the Knossos building three times. However, Knossos is fragile, so we set a maximum velocity to track the hits.
Here is the knossos building with the mallet hologram:

Note
For custom scoring factors we don’t need the analytic editor. We will implement the behavior using C# code
First we create a new C# script/class that inherits from ScoringFactor
public class ForceScoringFactor : ScoringFactor
{
    public float maximumForce = 12;

    UpdateCollisionForce _forceScript;
    float _currentForce;
    GameObject _knossosBackPart;
    ForceScoringFactor _forceSf;
    int _score;
    LanguageTranslator _errorMsg;

    public override ScoringFactor Initialize(GameObject g)
    {
        _forceSf = g.AddComponent<ForceScoringFactor>();
        _knossosBackPart = GameObject.Find("BackPartHitMallet(Clone)");
        _forceScript = _knossosBackPart.AddComponent<UpdateCollisionForce>();
        _forceScript.Init(maximumForce,true);

        _forceSf._currentForce = 0;

        return _forceSf;
    }

    public override float Perform(bool skipped = false)
    {
        Destroy(_forceSf);
        Destroy(_forceScript);
        if (skipped) return 0;
        int errors = _forceScript.GetErrorsCounter();
        _score = 100 - (errors * 20);

        return Mathf.Clamp(_score,0,100);
    }

    public override void Undo()
    {
        _score = 0;
        Destroy(_forceSf);
        Destroy(_forceScript);
    }

    public override object GetReadableData()
    {
        ScoringFactorData sfData = new ScoringFactorData();
        sfData.score = _score;
        sfData.outOF = (int) maximumForce;
        sfData.type = "Force Scoring Factor";
        sfData.scoreSpecific = (int) _forceScript.GetCollisionForce();
        sfData.errorMessage =  InterfaceManagement.Get.GetUIMessage(_errorMsg);

        return sfData;
    }
}
The ForceScoringFactor script implements our custom scoring factor.
The ScoringFactor class contains virtual functions for you to override in your custom scoring factors.
public override ScoringFactor Initialize(GameObject g)
The Initialize method is called to setup your custom scoring factor. Everything you need to spawn or configure you should implement it in this function.
Warning
Pay attention to the _forceSf variable. It contains an instance of your scoring factor. Use this instance to make your configurations for the Initialization.
E.g. _forceSf._currentForce = 0;
The line below adds a script to the Knossos prefab. This script returns the applied force from the mallet. In the same way you can implement your own scripts to gather information about the user’s performance.
_forceScript = _knossosBackPart.AddComponent<UpdateCollisionForce>();
public override float Perform(bool skipped = false)
The Perform method is called along with the Action’s Perform(). The purpose of this method is to return the score of the user.
It calculates the score with data retrieved from the UpdateCollisionForce script.
Make sure you clamp the score at 100
return Mathf.Clamp(_score,0,100);
public override object GetReadableData()
GetReadableData manages the data from the custom scoring factor that will be saved at the end of the Action.
It instantiates a new ScoringFactorData variable and overrides its fields:
score: The user’s score
outOF: In case the scoring factor contains a number of possible values (e.g angles, questions etc) this variable reflects this amount
type: The scoring factor’s name
scoreSpecific: The score directly from the script attached on our object. In this case the
UpdateCollisionForceerrorMessage: The error message to spawn when triggering this error
The final step is to link this scoring factor with our Actions script.
Below you can see the AssembleKnossosPartOfAction, our Action script.
public class AssembleKnossosPartOfAction : CombinedAction
{
    public override void Initialize()
    {
        AnalyticsManager.AddScoringFactor<ForceScoringFactor>(2);

        //InsertAction sub-Action
        //......
        //--------------------------------------------------------------------------------------------
        //InsertAction sub - Action
        //......
        //--------------------------------------------------------------------------------------------
        //ToolAction sub - Action
        ToolAction hitWithMallet = gameObject.AddComponent<ToolAction>();
        hitWithMallet.SetToolActionPrefab("Lesson0/Stage1/Action0/BackPartHitMallet", MAGES.ToolManager.tool.ToolsEnum.Mallet);
        hitWithMallet.SetHoloObject("Lesson0/Stage1/Action0/Hologram/MalletHologramL0S1A0");

        InsertIActions(insertFrontGateAction, insertBackGateAction, hitWithMallet);

        base.Initialize();
    }
}
Warning
AnalyticsManager.AddScoringFactor<ForceScoringFactor>(2);
This line connects our custom scoring factor with this Action. Don’t forget to add this line.
The (2) argument is because we attached this scoring factor to the second sub-Action.
This is the proper way to configure a custom scoring factor.