Build Instructions
In this section we describe the build process for the various platforms MAGES SDK supports.
Warning
The process is significantly different for each platform so make sure you follow the exact steps if you want to avoid surprises.
Windows
To build the application for Windows you need to follow the next steps:
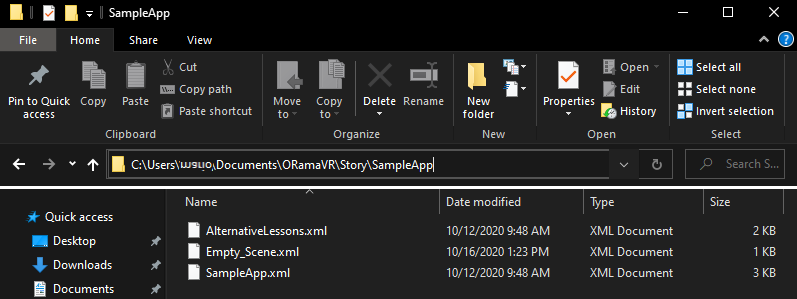
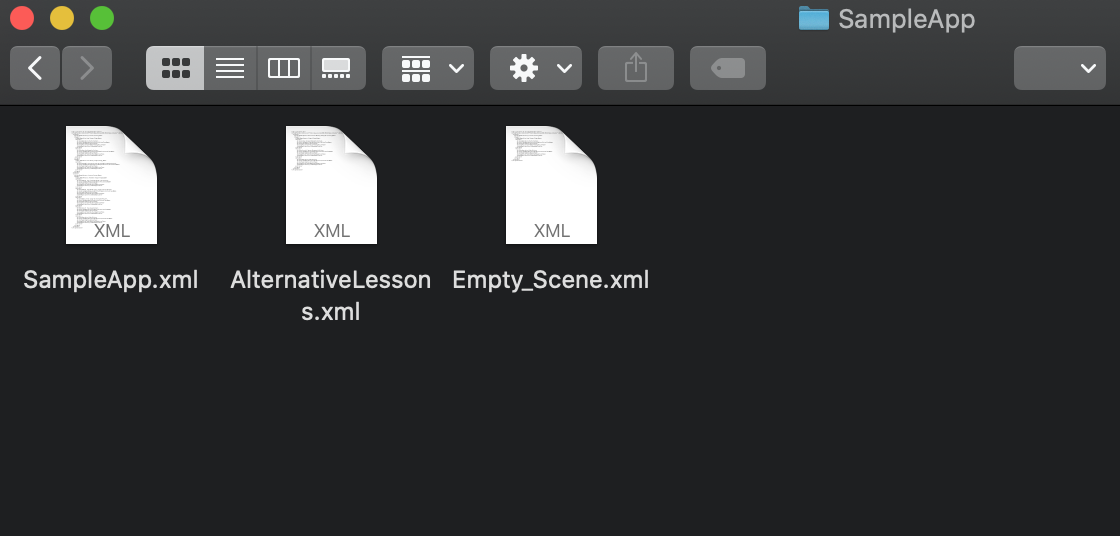
Copy the three .xml files under Assets/Resources/Storyboard/Platform/
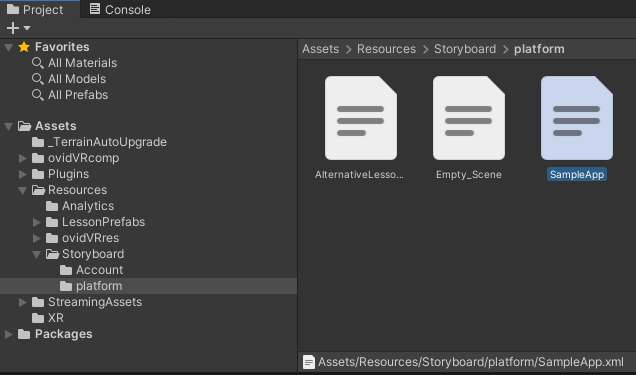
Paste them at the following path: /{User}/Documents/ORamaVR/Story/{ProductName}/
2.1. Most probably this path will not exist in your PC, create it by adding the new folders manually
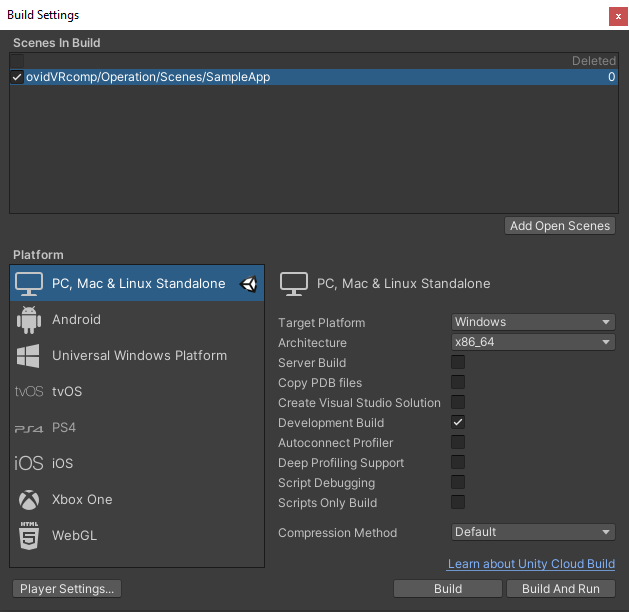
Open the Build Settings through File/Build Settings in the Unity Editor or by pressing
Ctrl+Shift+B3.1. Make sure the selected Platform is set to Windows
3.2. Ensure the Architecture is set to x86_64
Note
If you are building a release version, make sure to clear the
Development Buildcheckbox.
Click the Build button and select the output path of your executable.
Note
The default ProductName is “platform” for the SDK. If you want to alter it, set it manually at Scenegraph.cs through the Configuration options at void Start().
This step is mandatory for the StoryBoard to load correctly when running a built version.
MacOS
Warning
MAGES SDK does not currently support VR for the MacOS platform.
Thus applications utilizing MAGES SDK that are built on MacOS platform can only run in Desktop 3D mode.
The Desktop 3D camera can be spawned through the MAGES menu, by navigating at MAGES –> Third Party SDK Manager –> Initialized Prefabs –> Desktop3D.

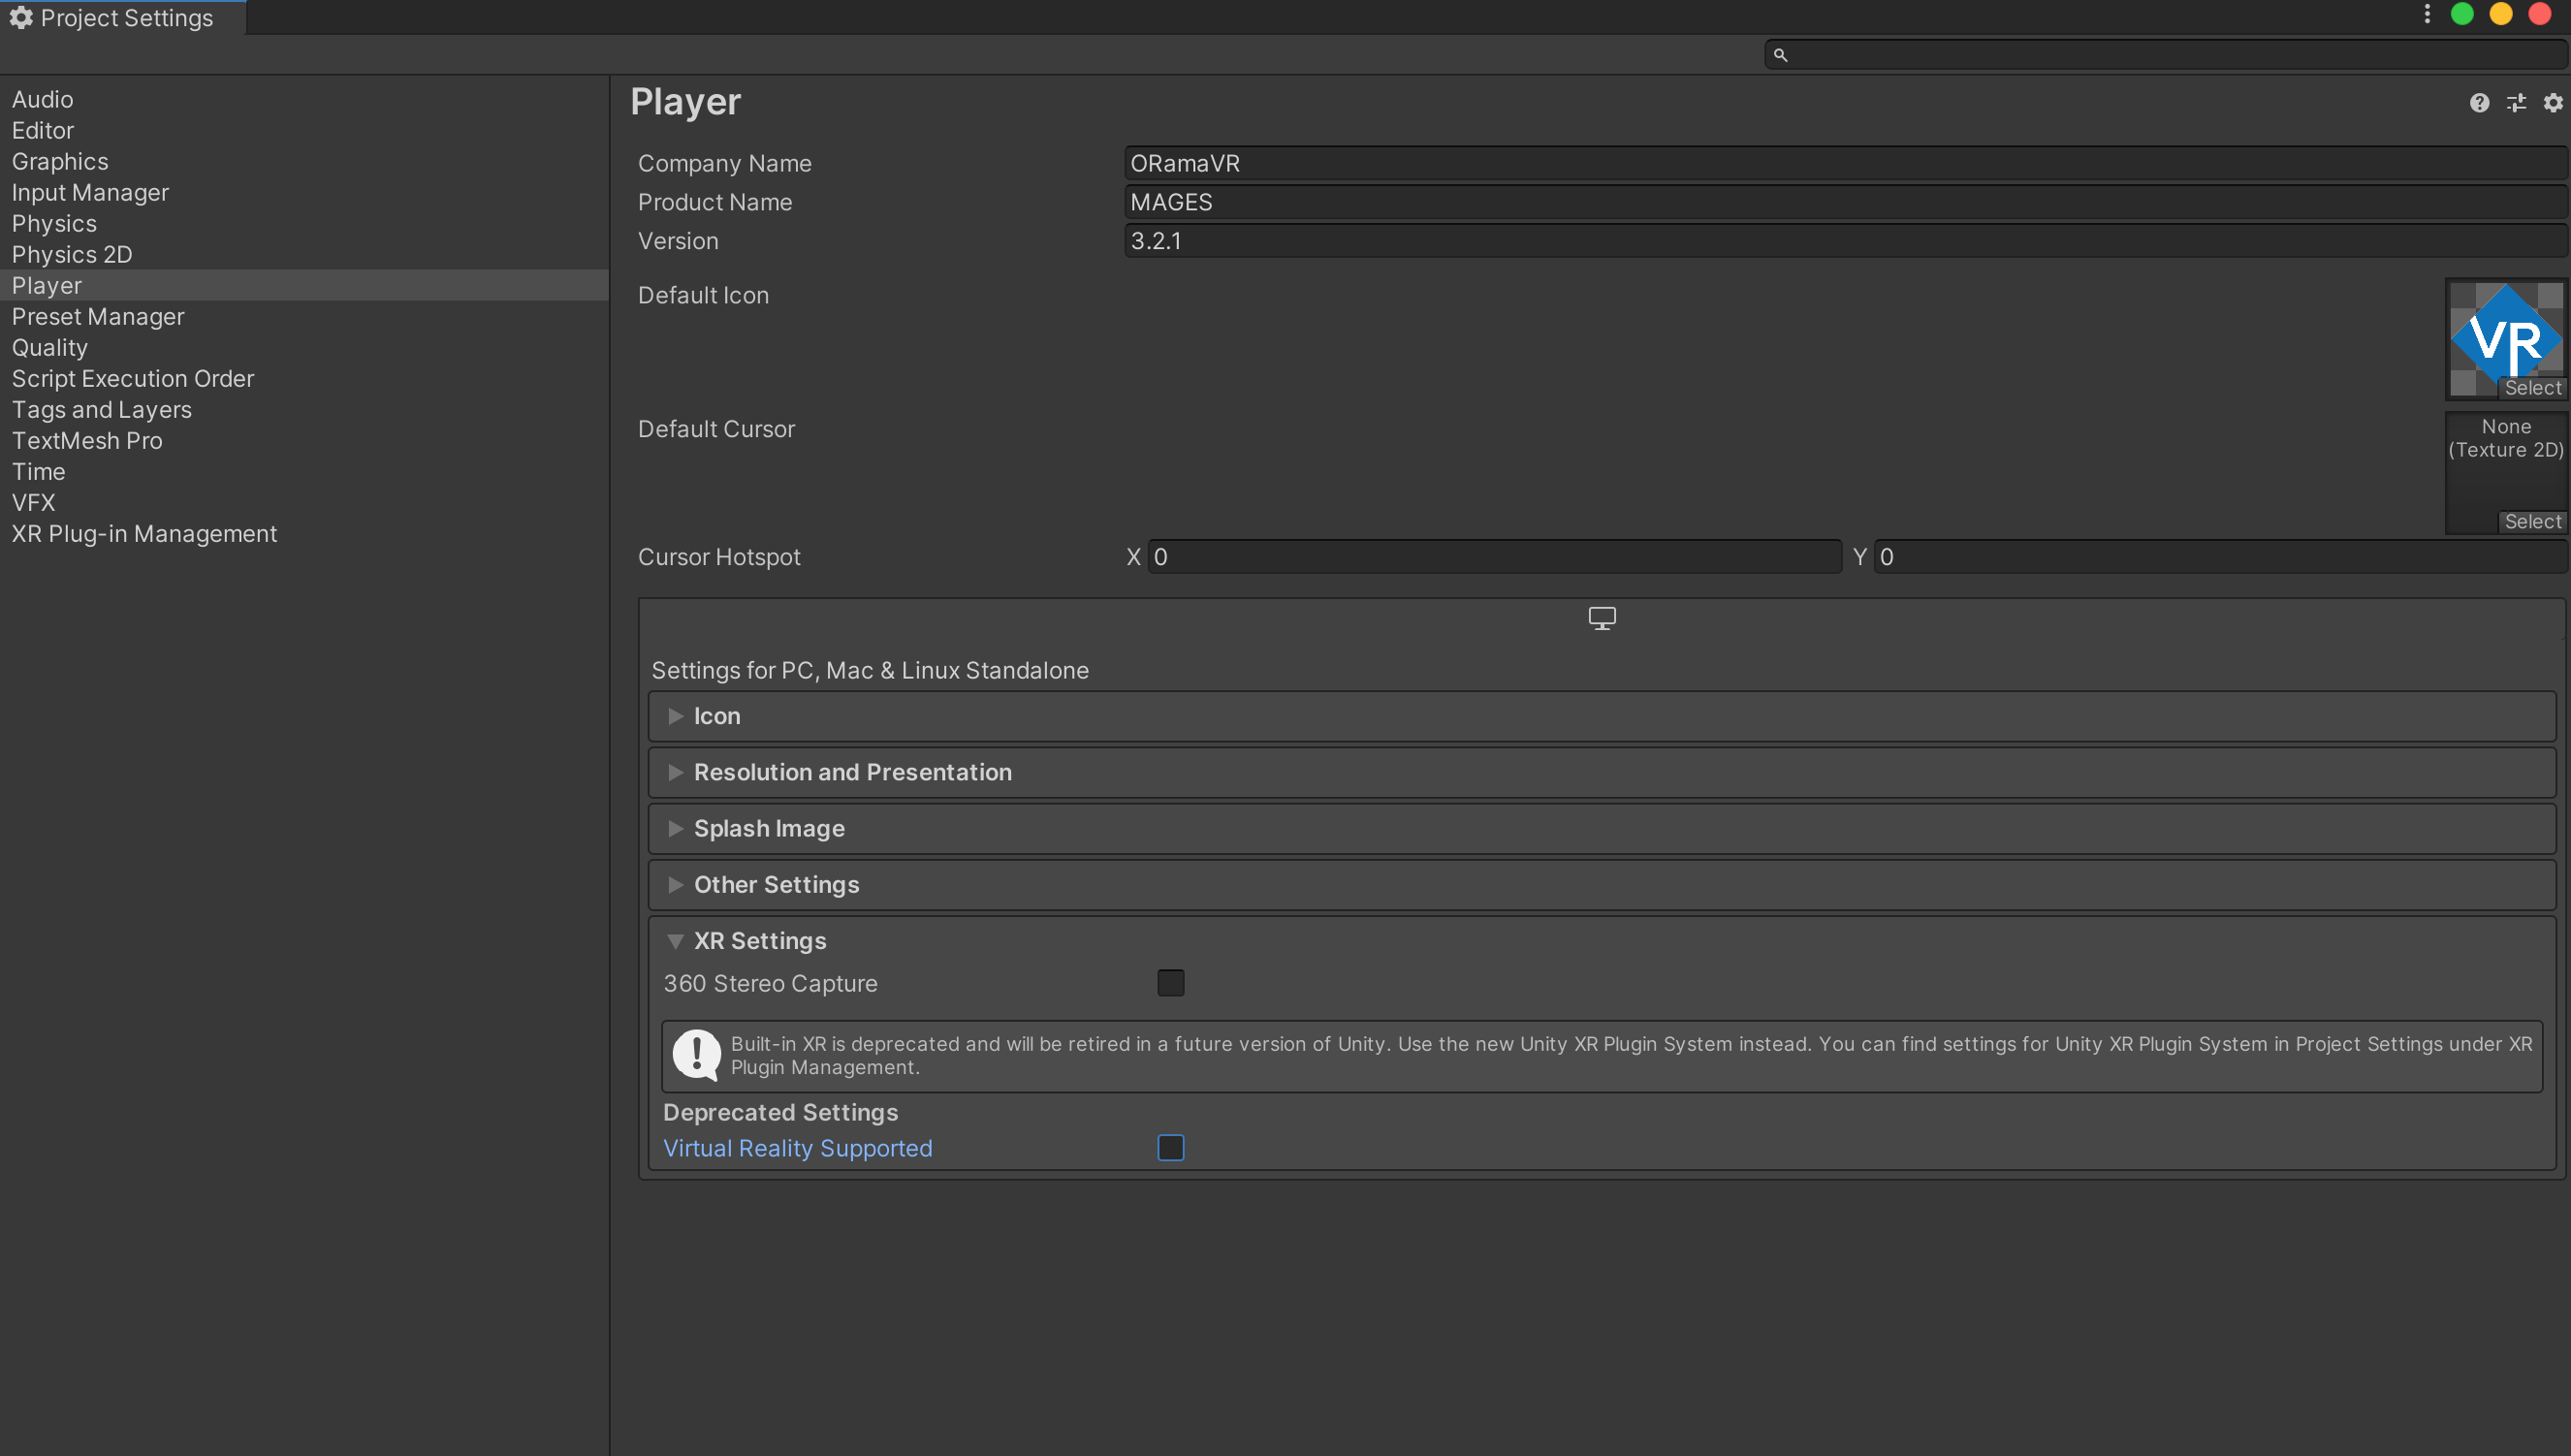
Finally, make sure that the Virtual Reality Supported checkbox under Project Settings –> Player Settings is unchecked.
To build the application for MacOS you need to follow the next steps:
Copy the three .xml files under Assets/Resources/Storyboard/Platform/
Paste them at the following path: /{User}/Documents/ORamaVR/Story/{ProductName}/
2.1. Most probably this path will not exist in your PC, create it by adding the new folders manually
Open the Build Settings through File/Build Settings in the Unity Editor
3.1. Make sure the selected Platform is set to Mac OS X

Note
If you are building a release version, make sure to clear the
Development Buildcheckbox.
Click the Build button and select the output path of your executable.
Android
The following guide covers build instructions for Oculus Quest and HTC VIVE Focus.
In order to deploy an application utilizing the MAGES SDK to an android mobile VR headset, it is mandatory to switch your target platform to Android.
This is done through File/Build Settings or Ctrl+Shift+B.
Click on the Android platform and finally click the Switch Platform button on the lower-right side of the current window.
Note
Switching between platforms induces significant compilation times. It is best that you develop on the platform you are targetting from the start.
Oculus Quest
To deploy your application to Oculus Quest, follow the steps below:
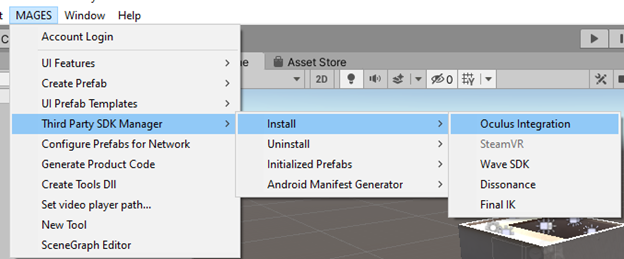
Install Oculus Integration. Click on the MAGES tab and select Third Party SDK Manager/Install/Oculus Integration.
The following window will appear. Click Download Oculus Integration to proceed.
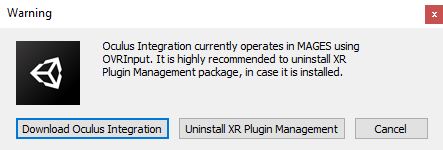
Warning
MAGES SDK currently supports Oculus Integration using OVRInput. If you have the XR Plugin Management package installed, there is a chance you will experience some conflicts.
Thus, this window prompts you to uninstall this package first. Once you are certain that this package does not exist in your project, click Download Oculus Integration to proceed.
Once the Oculus Integration installation finished, you are strongly recommended to restart Unity, ensuring that the installation is complete.
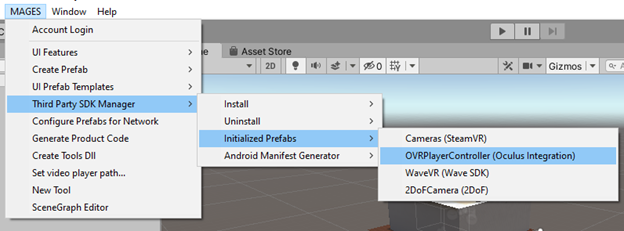
Make sure a player camera gameobject is present in the scene.
Note
To create one navigate to MAGES/Third Party SDK Manager/Initialized Prefabs/OVRPlayerController (Oculus Integration).. If you have another active MainCamera in the scene, a popup will inform you.
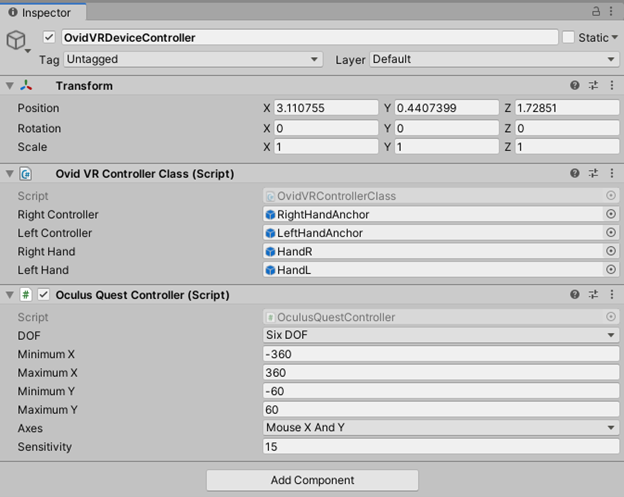
Navigate to OvidVRDeviceController gameobject and make sure that the OculusQuestController script is the only one present in this object along with the OvidVRControllerClass script.
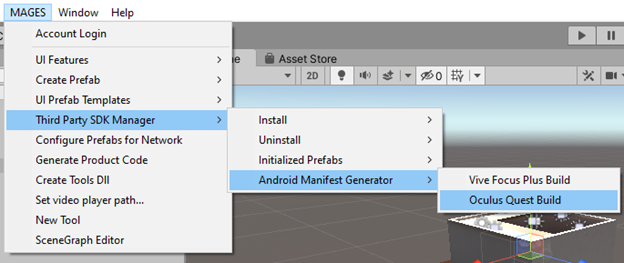
Android builds necessitate an AndroidManifest.xml in order to run correctly in the target platform.
6.1. To generate one, navigate to MAGES/Third Party SDK Manager/Android Manifest Generator/Oculus Quest Build.
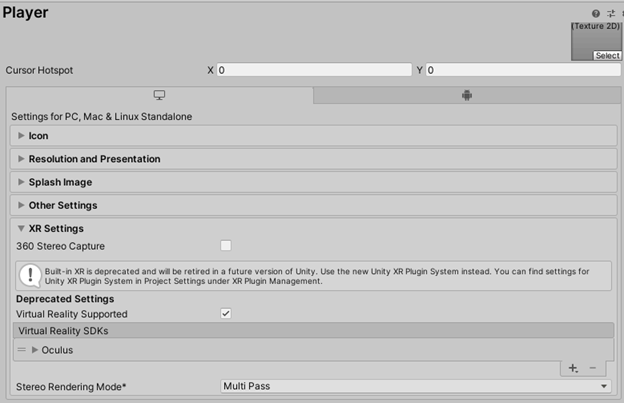
Finally, you need to set the Oculus SDK as the only Virtual Reality SDK.
7.1. To do so, navigate to Player Settings/XR Settings and make sure that the Oculus SDK is the only one in the Virtual Reality SDKs list.
VIVE Focus Plus
In order to access the Wave SDK packages needed to build your application for VIVE Focus Plus, do the following:
Open the manifest.json file located under Packages folder and add the following entry:
{
    "scopedRegistries": [
        {
            "name": "VIVE",
            "url": "https://npm-registry.vive.com",
            "scopes": [
                "com.htc.upm"
            ]
        }
    ]
}
Warning
Please make sure that your project quality settings are set to Low preset for VIVE Focus Plus.
To deploy your application to VIVE Focus Plus, follow the steps below:
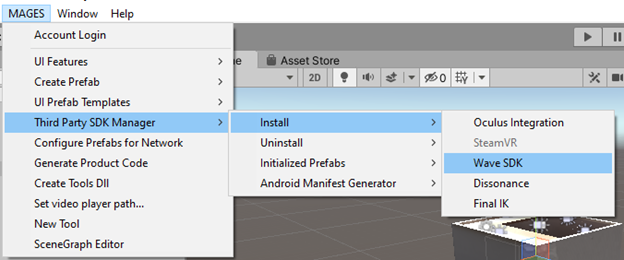
Install Wave SDK packages.
1.1. Click on the MAGES menu and then Third Party SDK Manager/Install/Wave SDK.
The following window will appear. Click Download Wave SDK to proceed.
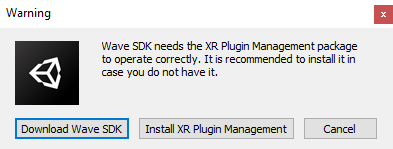
Note
MAGES SDK supports Wave SDK using Unity’s XR Plugin Management.
If you do not have the XR Plugin Management package, please install it by clicking the Install XR Plugin Management button.
Once this plugin is installed, you may click Download Wave SDK to proceed.
Make sure a player camera gameobject is present in the scene.
Note
To create one navigate to MAGES/Third Party SDK Manager/Initialized Prefabs/WaveVR (Wave SDK). If you have another active MainCamera in the scene, a popup will inform you.
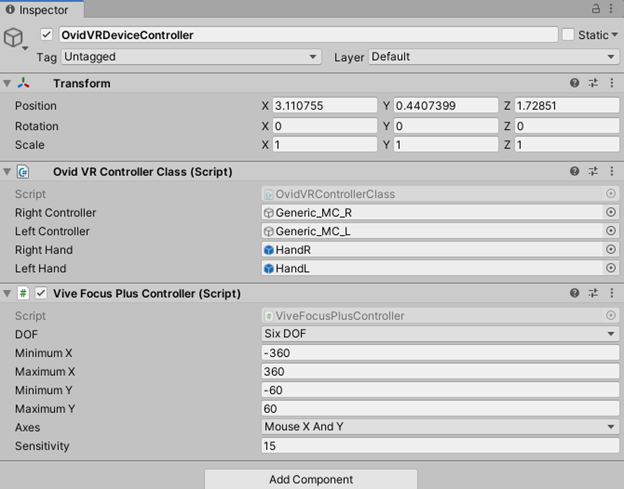
Navigate to OvidVRDeviceController gameobject and make sure that the ViveFocusPlusController script is the only one present in this object along with the OvidVRControllerClass script.
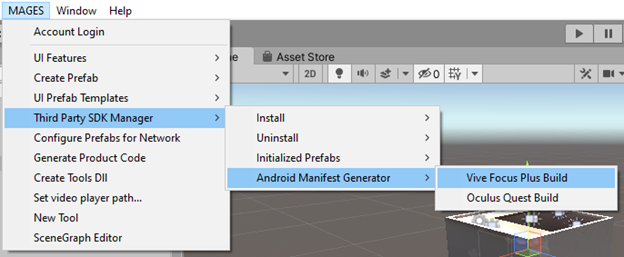
Android builds necessitate an AndroidManifest.xml in order to run correctly in the target platform.
6.1. To generate one, navigate to MAGES/Third Party SDK Manager/Android Manifest Generator/Vive Focus Plus Build.
Finally, navigate to Project Settings/XR Plugin Management and tick the Wave XR checkbox on the Android tab.
