Scenegraph Generation
In this tutorial we will generate a scenegraph tree from the beginning.
Note
Visual Scripting will be available in the next version (1.0); for the time being we will generate a scene-graph manually.
Creating a New Scenegraph
Using your text editor of choice, create a new xml file:
<?xml version="1.0"?>
<ArrayOfLessons xmlns:xsd="http://www.w3.org/2001/XMLSchema" xmlns:xsi="http://www.w3.org/2001/XMLchema-instance">
</ArrayOfLessons>
This is the basic structure of the SceneGraph; every lesson, stage and action node is contained within the top level node named ArrayOfLessons.
A lesson is declared with the tag Lessons, as well as another tag residing within it Lesson_Name which is used to display the name of the lesson:
<?xml version="1.0"?>
<ArrayOfLessons xmlns:xsd="http://www.w3.org/2001/XMLSchema" xmlns:xsi="http://www.w3.org/2001/XMLSchema-instance">
   <Lessons>
      <Lesson_Name>Starting Lesson</Lesson_Name>
      <!-- Stages... -->
   </Lessons>
</ArrayOfLessons>
Stages are declared in the same manner, so let’s add a couple of stages to the lesson node we just created:
<?xml version="1.0"?>
<ArrayOfLessons xmlns:xsd="http://www.w3.org/2001/XMLSchema" xmlns:xsi="http://www.w3.org/2001/XMLSchema-instance">
   <Lessons>
      <Lesson_Name>Starting Lesson</Lesson_Name>
      <Stages>
         <Stage_Name>Starting Stage</Stage_Name>
         <!-- Actions... -->
      </Stages>
      <Stages>
         <Stage_Name>Decision making Stage</Stage_Name>
         <!-- Actions... -->
      </Stages>
   </Lessons>
</ArrayOfLessons>
Actions are very similarly declared, but have extra properties; this is an action node in isolation:
<Actions>
    <Action>Insert the plug</Action>
    <ActionClassName>InsertPlugAction</ActionClassName>
    <ActionType>Simple</ActionType>
    <AverageActionTime>10</AverageActionTime>
    <IsDemoApplicable>y</IsDemoApplicable>
</Actions>
Note
You can read more about the different properties of lesson, stage and action nodes here.
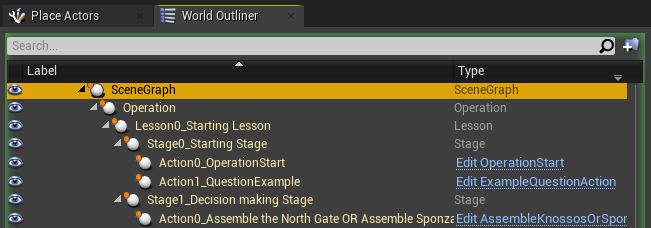
Let’s add some actions to our SceneGraph:
<?xml version="1.0"?>
<ArrayOfLessons xmlns:xsd="http://www.w3.org/2001/XMLSchema" xmlns:xsi="http://www.w3.org/2001/XMLSchema-instance">
    <Lessons>
        <Lesson_Name>Starting Lesson</Lesson_Name>
      <Stages>
        <Stage_Name>Starting Stage</Stage_Name>
        <Actions>
          <Action>OperationStart</Action>
          <ActionClassName>OperationStart</ActionClassName>
          <ActionType>Simple</ActionType>
          <AverageActionTime>10</AverageActionTime>
          <IsDemoApplicable>y</IsDemoApplicable>
        </Actions>
        <Actions>
          <Action>QuestionExample</Action>
          <ActionClassName>ExampleQuestionAction</ActionClassName>
          <ActionType>Simple</ActionType>
          <AverageActionTime>10</AverageActionTime>
          <IsDemoApplicable>y</IsDemoApplicable>
        </Actions>
      </Stages>
      <Stages>
        <Stage_Name>Decision making Stage</Stage_Name>
        <Actions>
          <Action>Assemble the North Gate OR Assemble Sponza</Action>
          <ActionClassName>AssembleKnossosOrSponzaAction</ActionClassName>
          <ActionType>Simple</ActionType>
          <AverageActionTime>10</AverageActionTime>
          <IsDemoApplicable>y</IsDemoApplicable>
        </Actions>
      </Stages>
    </Lessons>
</ArrayOfLessons>
The final step is to configure the XML file in the paths asset.
Note
XML files can be stored anywhere, but it is recommended that they be stored under the Saved/OramaVR/XMLFiles folder in the root project directory.
Navigate to the Paths asset used in the “Scene Graph” actor and open the asset.
Set the “Operation XML Path” property to the XML file (relative to the project directory) and save the asset.
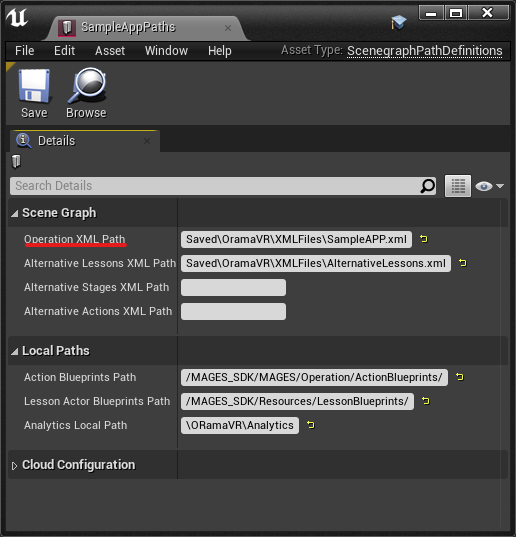
That’s it! Press play inside the editor and the scenegraph will be populated under the Scene Graph actor.
Generating Alternative Nodes
Alternative nodes are also declared as SceneGraph XML files. Here is an example of an AlternativeLessons.xml file, containing one lesson node to be inserted to the scenegraph depending on the user’s actions:
<?xml version="1.0"?>
<ArrayOfLessons xmlns:xsi="http://www.w3.org/2001/XMLSchema-instance" xmlns:xsd="http://www.w3.org/2001/XMLSchema">
    <Lessons>
        <Lesson_Name>Sponza Restoration ADD(0|1|0-0|0|0)</Lesson_Name>
        <Stages>
            <Stage_Name>Sponza Stage</Stage_Name>
            <Actions>
                <Action>Clean Sponza</Action>
                <ActionClassName>UseAction</ActionClassName>
                <ActionType>Simple</ActionType>
                <AverageActionTime>10.0</AverageActionTime>
                <IsDemoApplicable>y</IsDemoApplicable>
            </Actions>
            <Actions>
                <Action>Burn Sponza</Action>
                <ActionClassName>UseWithToolActionBP</ActionClassName>
                <ActionType>Simple</ActionType>
                <AverageActionTime>10.0</AverageActionTime>
                <IsDemoApplicable>y</IsDemoApplicable>
            </Actions>
            <Actions>
                <Action>Operation End (Alternative)</Action>
                <ActionClassName>OperationEndAlternative</ActionClassName>
                <ActionType>Simple</ActionType>
                <AverageActionTime>10.0</AverageActionTime>
                <IsDemoApplicable>y</IsDemoApplicable>
            </Actions>
        </Stages>
    </Lessons>
</ArrayOfLessons>
Upon inspection, the main difference between this and the scenegraph file we previously created is the Lesson_Name tag:
<Lesson_Name>Sponza Restoration ADD(0|1|0-0|0|0)</Lesson_Name>
Apart from the actual name of the lesson, there are additional directives that will instruct SDK on when and where the lesson node in question will be inserted (or otherwise) in the scene graph.
The syntax used here can be described as follows:
<Alternative Type> ( <Trigger Action ID> - <Additional Node> )
Alternative Type: The type of this alternative path (ADD, DEL, RPL). In this case, it is set to
ADDsince we want this lesson to be added to the scene-graph.Trigger Action ID: The action that can trigger the alternative path. In our case, the action
AssembleKnossosORSponzaActionwill have an LSA ID of010(Lesson 0, Stage 1, Action 0).Additional Node: In case of an
ADDAlternativeType this variable sets the left sibling of our added node. In this example, if we set the AdditionalNode to000, our new node will be added as a sibling next to000meaning that it will be the100node (the second Lesson)Warning
Alternative nodes are saved in separate files; no modification should happen on the main XML file.
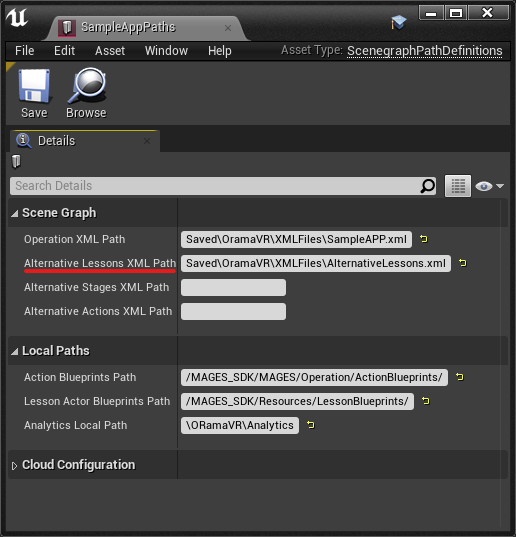
In the same manner, the path to the alternative node file is registered into the “Alternative (Lessons/Stages/Actions) XML Path” property in the paths asset.
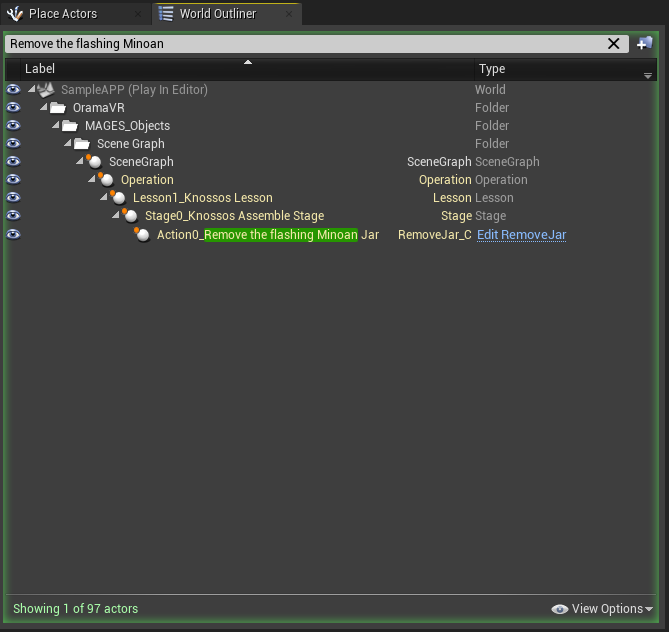
Finding Nodes by Name
To find a node by its name, you can search for it by typing into the “Search” field, in the “World Outliner” window