Parallel Action
The ParallelAction is used to instantiate two or more Actions simultaneously. Then the user can decide which one will complete first.
Additionally, ParallelAction can modify the Scenegraph tree according to the user’s decisions. ParallelActions are usually linked with critical errors. For example, we may implement a ParallelAction which has a correct and a wrong Action to Perform. If the user decides to complete the correct Action, then the simulation will continue as usual. However, if the user completes the wrong Action (for instance inserting an object in a wrong place) then this behaviour will trigger the alternative path and the scenegraph will be modified runtime by adding or removing specific Actions.
For instance, if the user causes damage to a human bone, the scenegraph will populate a new stage that forces the user to correct his mistake by rapairing the fracture. In another example, if the user paints a car with the wrong color, scenegraph can add new Actions in order to repaint it.
You can read here a detailed article on ParallelActions.
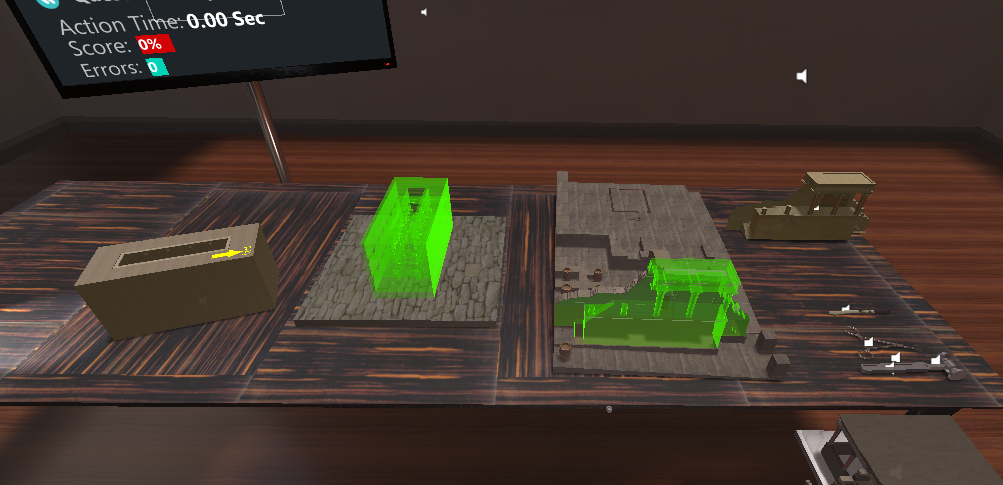
In this example, we will implement a ParallelAction where the user needs to decide whether to assemble the Knossos model or the Sponza model.
This Action is part of the SampleApp scene with class name AssembleKnossosORSponzaAction
Note
The “normal” path is the assemble of Knossos and the “alternative” the assemble of Sponza.
As a result, if the user decides to assemble the Knossos, the scenegraph will move to the next Action. However, if he assembles the Sponza, the alternative path will trigger to add a new Lesson node to the scenegraph runtime.
Action Script
The script below initializes the ParallelAction Action.
using ovidVR.ActionPrototypes;

public class AssembleKnossosORSponzaAction : ParallelAction {

    public class AssembleKnossosPartOfAction : InsertAction
    {
        public override void Initialize()
        {
            SetInsertPrefab("Lesson0/Stage1/Action0/FrontPartInteractable", "Lesson0/Stage1/Action0/FrontPartFinal");
            SetHoloObject("Lesson0/Stage1/Action0/Hologram/FrontPartHologram");

            base.Initialize();
        }
    }

    public class AssembleSponzaPartOfAction : InsertAction
    {
        public override void Initialize()
        {
            SetInsertPrefab("Lesson0/Stage1/Action0/SponzaInteractable", "Lesson0/Stage1/Action0/SponzaFinal");
            SetHoloObject("Lesson0/Stage1/Action0/Hologram/HologramSponzaFinal");

            base.Initialize();
        }
    }

    public override void Initialize()
    {
        //Sets the two parallel Actions
        AssembleKnossosPartOfAction assembleKnossosPartOfAction = this.gameObject.AddComponent<AssembleKnossosPartOfAction>();
        AssembleSponzaPartOfAction assembleSponzaPartOfAction = this.gameObject.AddComponent<AssembleSponzaPartOfAction>();

        //Set different event Manager for second Action
        assembleSponzaPartOfAction.SetEventListener("SponzaPart");

        //Configures the altPath variable: -1 for the default path and 0 for the alternative
        //In case we have more than one alternative path insert distinct integers as altPath ID.
        InsertIActionToDictionary(-1, assembleKnossosPartOfAction);
        InsertIActionToDictionary(0, assembleSponzaPartOfAction);

        base.Initialize();
    }
}
Script explanation
As you can see the ParallelAction script follows a nested syntax, encapsulating the parallel Actions into a single class. Both the insert Actions are implemented as usual. However, the Initialize method of ParallelAction introduces extra functions.
At the first two lines we add both parallel Actions to the same script in a similar way we did on the Combined Action.
AssembleKnossosPartOfAction assembleKnossosPartOfAction = this.gameObject.AddComponent<AssembleKnossosPartOfAction>();
AssembleSponzaPartOfAction assembleSponzaPartOfAction = this.gameObject.AddComponent<AssembleSponzaPartOfAction>();
The next step is to set a different event listener for each Action. The default event listener will be taken by the first parallel Action and will be set as the name of the Action.
Thus, we have to set additional event listeners for all the following parallel Actions. In our case we set the event listener of the AssembleSponzaPartOfAction.
assembleSponzaPartOfAction.SetEventListener("SponzaPart");
The final step is to configure the altPath variable on each Action. In our example, the AssembleKnossosPartOfAction is the default path and the AssembleSponzaPartOfAction is the alternative.
This means that if we perform the AssembleKnossosPartOfAction then nothing happens because -1 is the default path ID but if we perform the AssembleKnossosORSponzaAction then it will trigger the alternative path linked with this Action.
InsertIActionToDictionary(-1, assembleKnossosPartOfAction);
InsertIActionToDictionary(0, assembleSponzaPartOfAction);
Scenegraph configuration
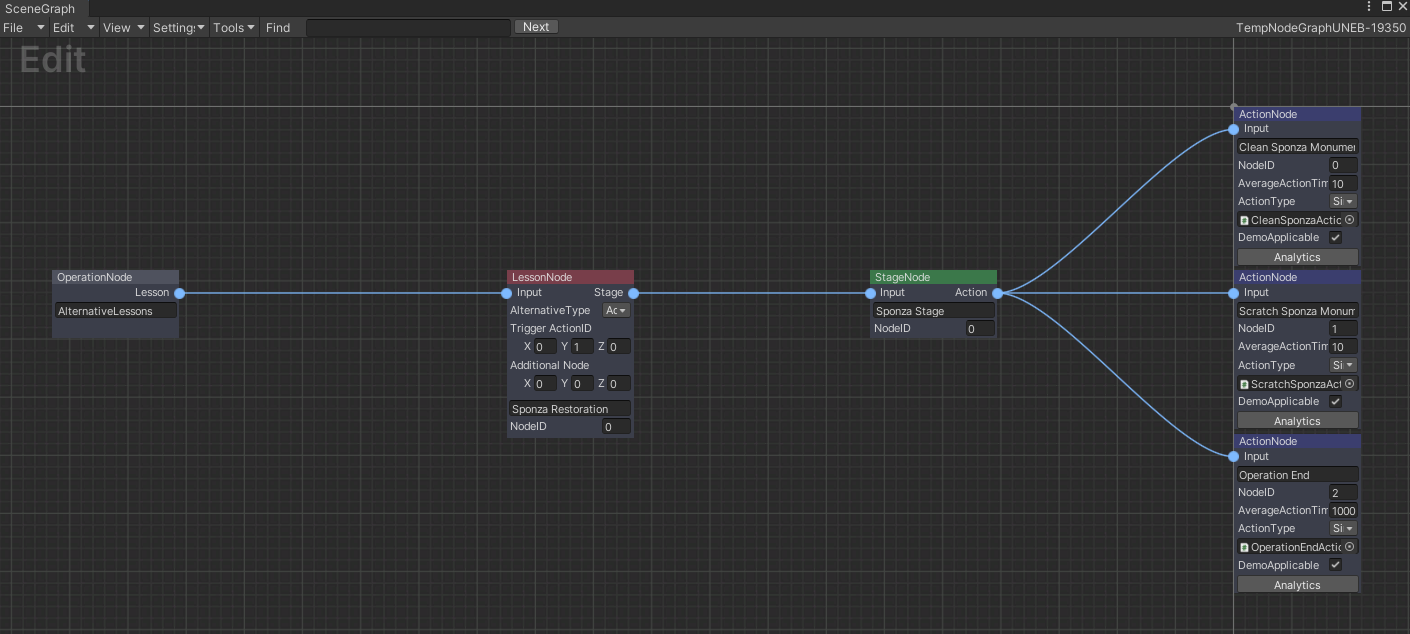
Now we will generate the Lesson node that will be added to the scenegraph in case the user triggers the alternative path.
From the MAGES menu navigate to MAGES/Scenegraph Editor.

From the Scenegraph editor go to File/Create New. A new graph will be created. In this case we need to generate an alternative lesson to add runtime to scenegraph.
Create an operation root Node by right clicking on the scenegraph editor and selecting Operation Node. Name the operation node description similar with the operation.
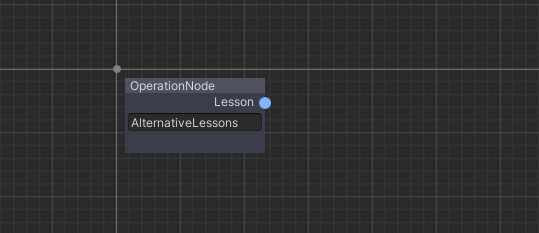
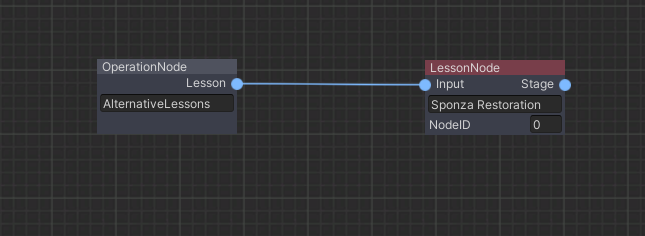
Now create the LessonNode. Right click on the scenegraph editor and select the lesson Node option. Fill the lesson node description.
Now we need to to convert the lesson node into an alternative node. Right click on the lesson node and select the
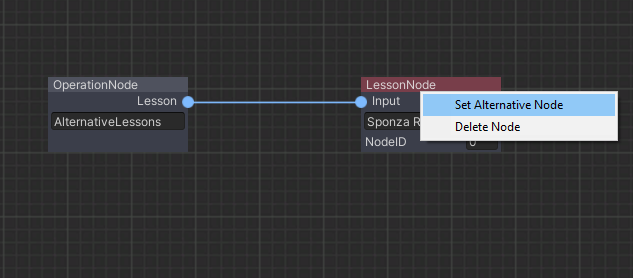
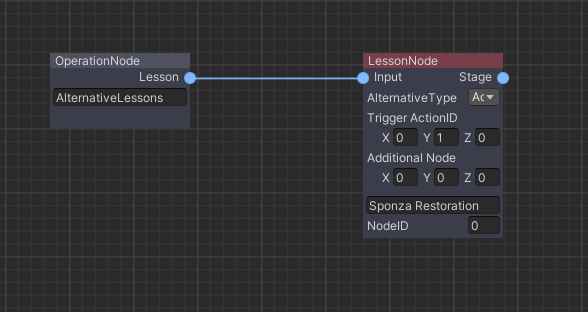
You can see that now the alternative node has additional parameters. We need to make some configuration to setup the alternative node.
AlternativeType: Here we will set the type of this alternative path (ADD, DEL, RPL). In this case we set it to ADD since we want this lesson to be added to our scenegraph.
TriggerActionID: This parameter sets the Action that will trigger the alternative path. In our case, the Action AssembleKnossosORSponzaAction will have IDs 010 (Lesson 0, Stage 1, Action 0).
AdditionalNode: In case of an ADD AlternativeType this variable sets the left sibling of our added node. In this example, if we set the AdditionalNode to 000, our new node will be added as a sibling next to 000 meaning that it will be the 100 node (the second Lesson)
We add the Stage and Action nodes to the alternative lesson in the usual way
In our example, if the user inserts the Sponza instead of the Knossos, then this lesson node will be added as the second lesson of the operation. This node contains additional Actions for the Sponza (UseAction and ToolAction) and finally the OperationEnd Action.
Below you can see the final alternative lesson scenegraph.
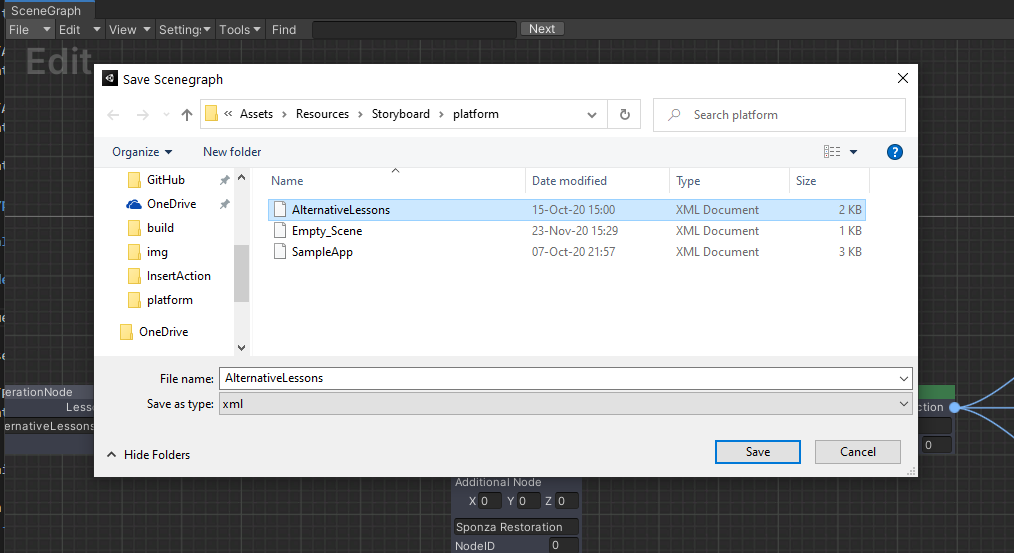
We save the alternative lessons scenegraph by navigating to File/Save As from the Scenegraph Editor menu. You should save the alternative lessons scenegraph to the same path with your main scenegraph .xml (under a folder with your product name)
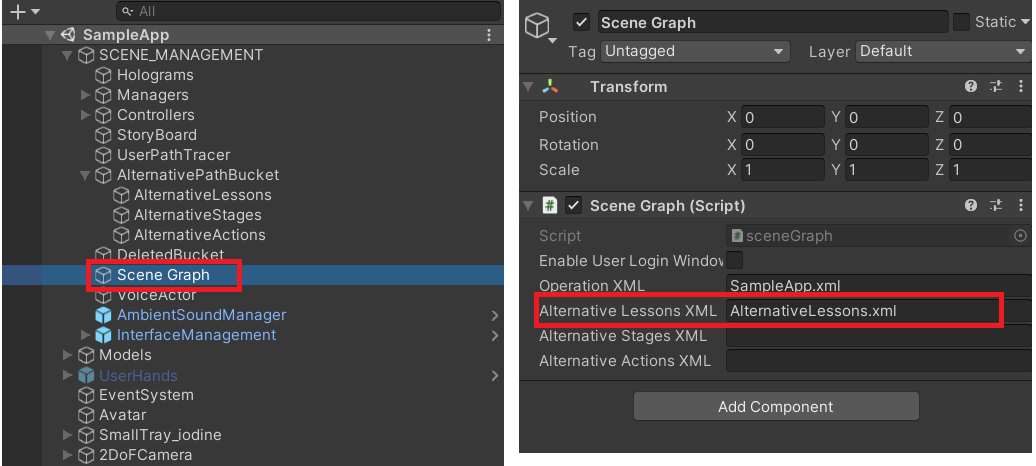
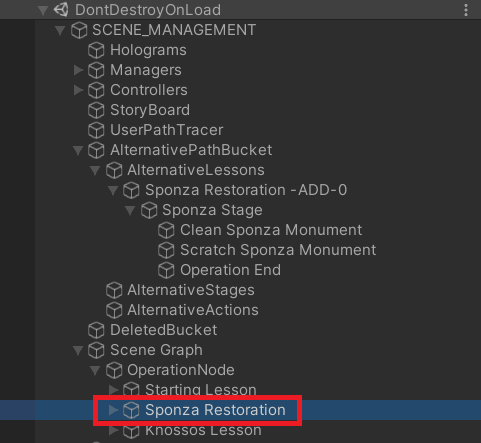
The final step is to register the AlternativeLessons.xml to our training module. From the Unity Editor, navigate to SCENE_MANAGEMENT/Scene Graph (gameObjects) and add the AlternativeLessons.xml to the SceneGraph.cs script as seen below. Here you can see the main scenegraph .xml as well.
Parallel Action explanation
Now lets see what happens when we start the application.
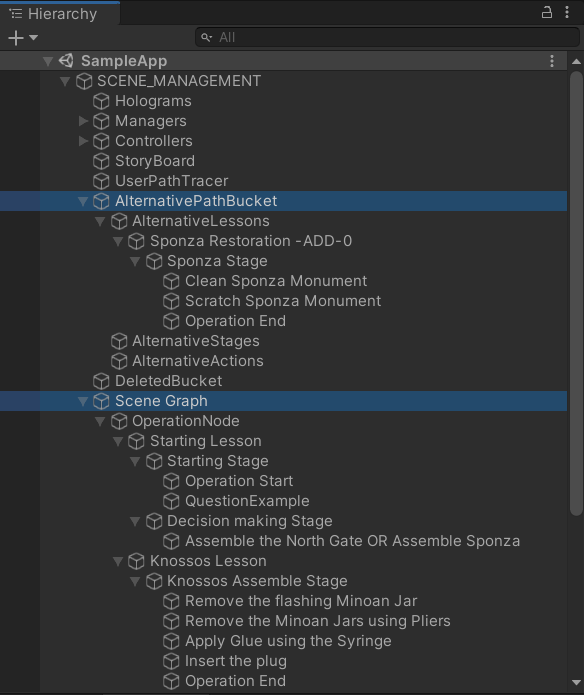
The scenegraph loads the LSA graph at the Scene Graph gameObject on the hierarchy. Additionally, our alternative lesson will be added in a separate gameObject, the AlternativePathBucket.
Here is where all the alternative nodes are saved, waiting to be spawned in the scenegraph.
You can see that the Sponza Restoration lesson has the ADD - 0 opcode next to the lesson name, this means that it will be added next to the first lesson.
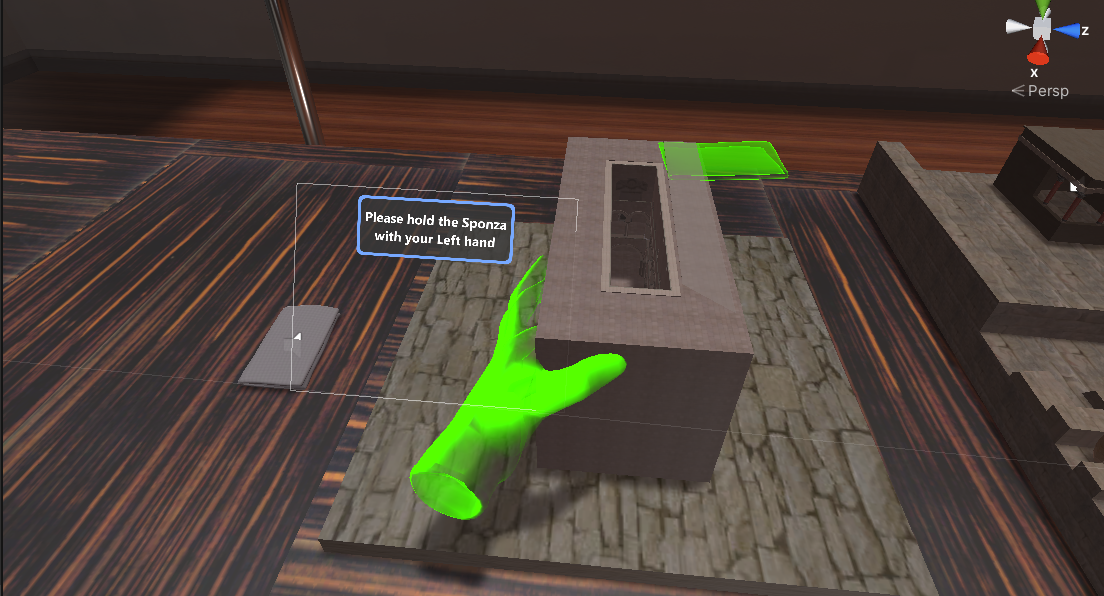
Now lets move to the AssembleKnossosORSponzaAction Action that will trigger the alternative path.
As you can see both Actions are Initialized simultaneously, the user should decide which one will complete.
To trigger the alternative path we have to insert the Sponza model.
Once performing the AssembleSponzaPartOfAction Action, you will see that the alternative lesson we set before will take the place of the second lesson in our operation.
As a result the next Actions will be the alternative Actions we configured in the alternative lesson node.
Note
Both alternative Actions will Perform() when completing the ParallelAction.
If you Undo() and come back to the ParallelAction, the alternative lesson will be deleted from the scenegraph hierarchy (reset).