Languages Support in MAGES™ SDK
Warning
This feature will replace the standard language system in the future.
MAGES™ SDK provides multilingual capabilities. Any application that is created with MAGES™ SDK can support different languages. It is up to the developers to provide the languages of their choice, as well as the possible translations for the text(s) they desire in each language.
MAGES™ SDK Languages Setup
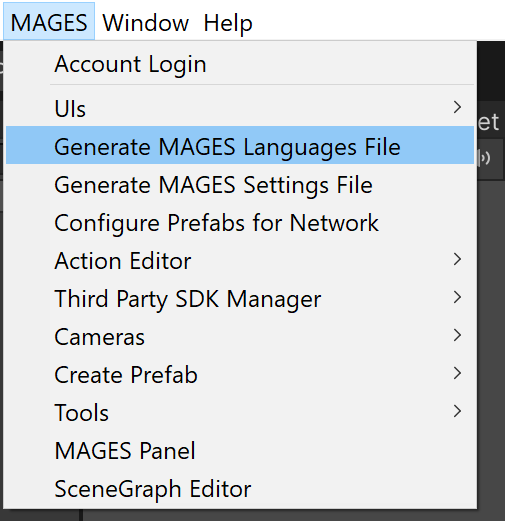
In order to be able to utilize MAGES™ SDK languages support, a MAGES Languages asset file must be created. To create a MAGES Languages asset file, navigate to the MAGES menu and click Generate MAGES Languages File as shown in the following image.
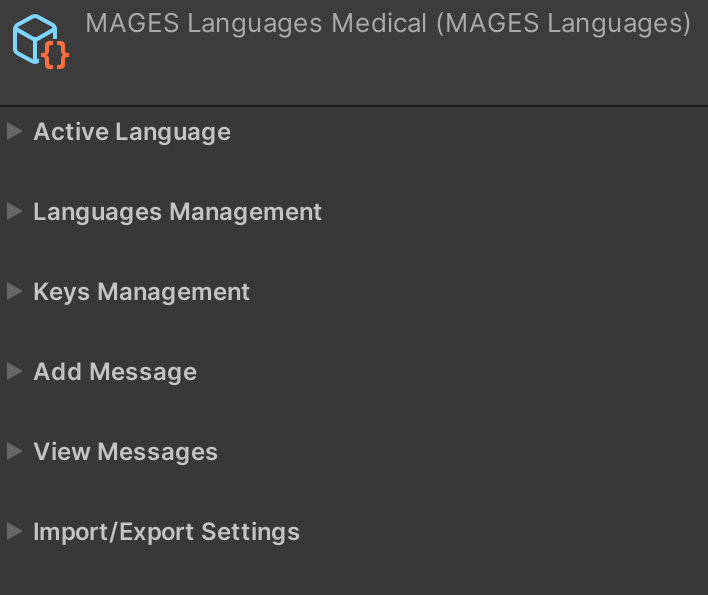
Once created, you will notice that the language asset contains the following settings:
Option
Description
Active Language
Expand this to set the active language of the application.
Languages Management
Expand this to present options regarding the addition/removal of a language.
Keys Management
Expand this to present options regarding the addition/removal of a key.
Add Message
Expand this to present options regarding the addition/removal of a message.
View Messages
Expand this to view added messages.
Import/Export Settings
Import an existing json file with languages/keys/messages into the languages asset, or Export the languages/keys/messages of the asset to a json file.
Setting an active language
Through this section, you can set the language that will be used throughout the application.
To do so, simply expand the Active Language section, select a language from the dropdown menu and click the submit button.

Warning
To set an active language, you must have at least added one language to the languages asset.
Adding/Removing a Language
To add a new language to the application, expand the Languages Management section.

Type in the text field the name of the new language.
Finally, click the Submit button.
Following the same procedure, to remove a language expand the Languages Management section.

Click the Remove Language button.
Select the language you wish to remove from the dropdown list and click the Submit button.
Adding/Removing a Key
Keys are the identity of the messages. Each key serves as an ID for the language system to understand which message must be translated to a specific language.
Note
- For instance:
Let there be two keys. The first key would be Key1 and the second one Key2. Also let there be two languages ENG and GER.
Let us add messages for Key1 and Key2. In the language system this is saved as follows:
Key
ENG
GER
Key1
Hello
Hallo
Key2
What’s your name?
Wie heißt du?
This means that when you select Key1 to be translated and the active language is GER, the output text will be “Hallo”.
To add a new key to the application, expand the Keys Management section.

Click the Add Key button.
Type in the text field the name of the new key.
Finally, click the Submit button.
Following the same procedure, to remove a key expand the Keys Management section.

Click the Remove Key button.
Select the key you wish to remove from the dropdown list and click the Submit button.
Adding a Message
To add a new message, expand the Add Message section.
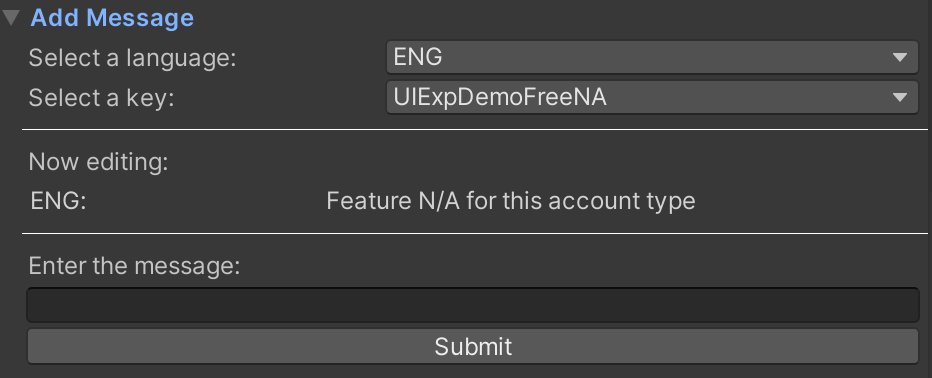
You will be presented with two dropdown lists and a text field.
Select the language for this message (first dropdown list) and the key that this message corresponds to (second dropdown list).
Type the desired message in the text field.
You can also view the message corresponding to the specific key, if there is one saved, in the Now editing section.
Click the Submit button to add your message.
Viewing a Message
To view all the registered messages for a specific key, expand the View Messages section.

Select a key from the dropdown list, to view its registered messages for each language.
Messages Import
To import messages/languages/keys, you will need a corresponding .json file.
Note
If you are upgrading from the old language system, import the LanguageTranslationMsg.json file.
Expand the Import/Export Settings section.

Set the .json file reference to the corresponding field.
Click the Import File button.
Warning
This action will overwrite all your previous messages/languages/keys.
Messages Export
This option will export the messages/languages/keys contained in the specific languages asset to a .json file.
Note
This could be useful if you would like to create a backup of your language data to import it again later into another application.
Expand the Import/Export Settings section.

Click the Export File button.
Note
The file will be exported under the Assets/Resources folder.
Setting active language asset
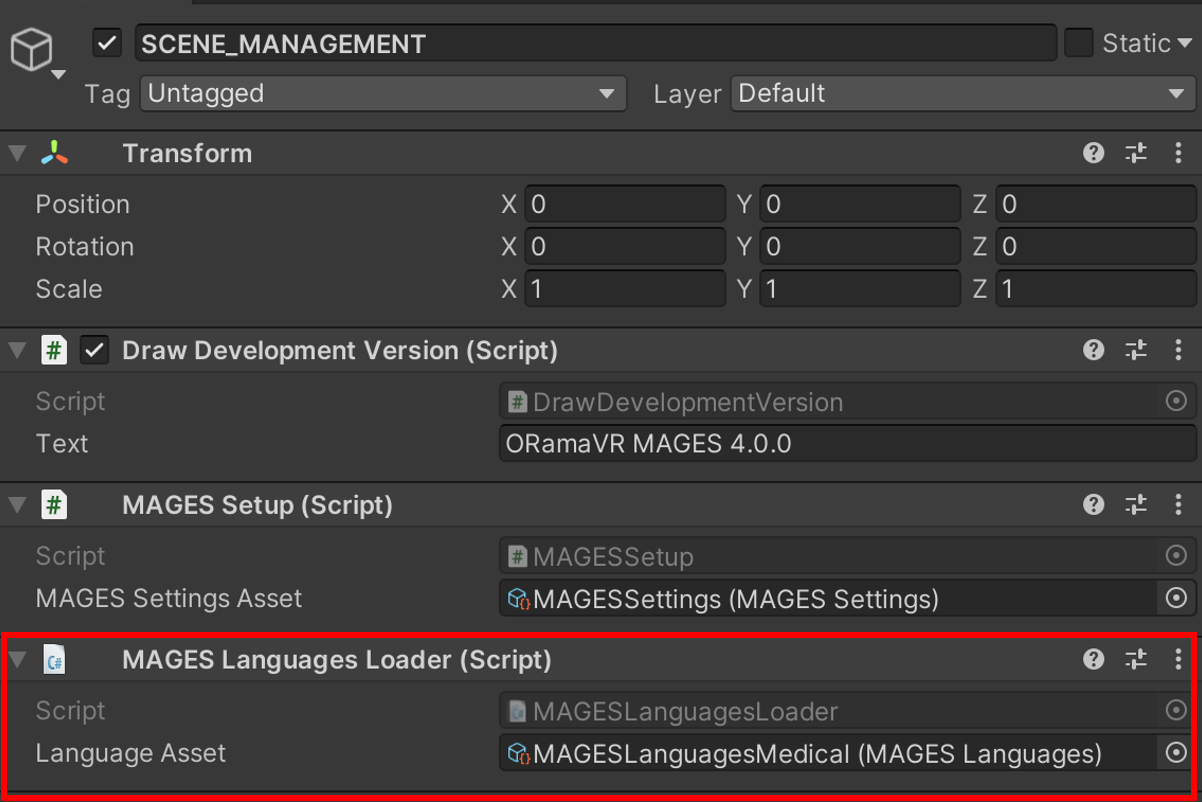
You may have multiple language assets in a project, but only one may be used in each application.
To correctly define the language asset that will be used by your application, drag and drop the one you desire to the MAGES Languages Loader component, which can be found on the SCENE_MANAGEMENT gameobject.
Note
- The language asset set in languages loader will also be used for the analytics error messages. The keys shown in the analytics window, are loaded from that asset.
Text translation
Once the language asset has been correctly setup, you can set automatic translation to your text components.
Translation with MAGES Languages, requires a text component containing the text that you would like to be translated.
To enable automatic translation, add the UILanguageSwap component to the same gameobject, which contains the text component as shown in the image below.
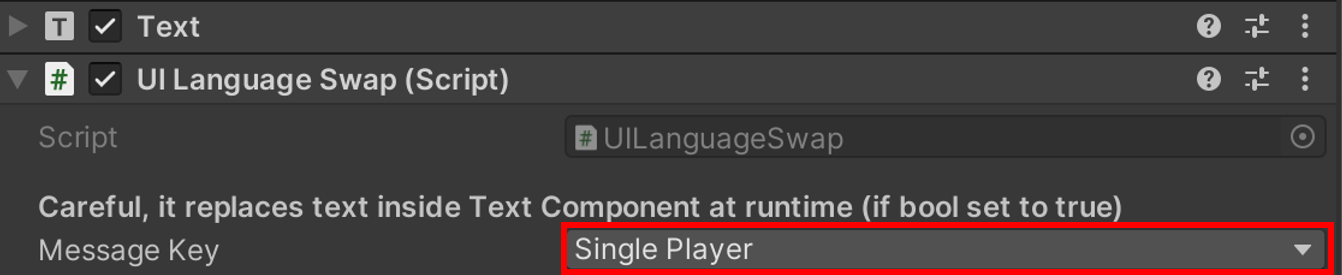
Select the key containing the message that you would like to appear in the text component.