Record & Replay Custom Events
During the development process of a new simulation with the MAGES SDK, there are cases where some events are not replayed. This is caused by the fact that the functionality which is under development is not recorded correctly. This happens because the feature is custom-made and does not use a script or an object provided by the SDK. In that case, one can utilize the CustomRecord.cs and CustomReplay.cs scripts.
Record Custom Messages
In order to record a specific event one has to create a script that inherits from the CustomRecord script. In the following code example one can see how a custom message is recorded:
using MAGES.RecorderVR;
using System.Collections;
using UnityEngine;

public class MyAppCustomRecord : CustomRecord
{
    void Start()
    {
        AddMessage("PRINT");
        StartCoroutine("CustomRecordMethod");
    }

    IEnumerator CustomRecordMethod()
    {
        yield return new WaitForSeconds(10);
        WriteMessage("PRINT", "Custom_Event_1");
    }
}
In the Start method the custom messages have to be registered. In that example we create a new message called “PRINT”. One has to register all the custom messages in the start of that MonoBehaviour script. Afterwards, we call a coroutine that after 10 seconds from when the Start method is executed it writes a new message. Keep in mind that WriteMessage can be called by any method that is executed in your simulation. So, one can call it by writing:
GameObject.Find("RecordingManager").GetComponent<MyAppCustomRecord>().WriteMessage("PRINT", "Custom_Event_2");
In that example we have written two different messages in the VR Recorder’s files. Both messages are of the same type, i.e. “PRINT”. Thus, when in replay, the same method will be called when these two messages are read. However, the messages have two different signals, which are the second arguments of the WriteMessage method. The signals are used as an argument to the CustomReplay’s method that is associated with a specific message. Note, that at the moment the VR Recorder can understand only one signal of type string. Finally, if you don’t want to write a signal, just omit the second argument of the WriteMessage method.
Replay Custom Messages
In order to replay a specific event one has to create a script that inherits from the CustomReplay script. In the following code example one can see how a custom message is replayed:
using MAGES.RecorderVR;

public class MyAppCustomReplay : CustomReplay
{
    void Start()
    {
        AddMessage("PRINT", PrintMessage);
    }

    void PrintMessage(string arg)
    {
        print(arg);
    }
}
In this CustomReplay script we register the custom messages we created, the same way we did for the CustomRecord script. This time, the second argument of the AddMessage method is another method, called PrintMessage in our example. This method will be called when the Message “PRINT” is read from the recorded files.
In our example the PrintMessage method just prints the signal of the message that was recorded. Thus, the string “Custom_Event_1” will be printed aproximately after ten seconds from when the replay starts. Keep in mind that the frame rate when the session is recorded is different from the frame rate when it is replayed. This is the reason why the string will be printed approximately after ten seconds.
In your methods linked with the new custom messages in your CustomReplay class, you write the lines of code you want to be executed when the messages is read. Those lines are almost the same with the ones executed when the message is written in recording mode. Finally, if you didn’t send a signal when you recorded a message don’t use the arg parameter of the method. However, a string argument has to be written in the parameters due to the way that the VR Recorder handles custom messages.
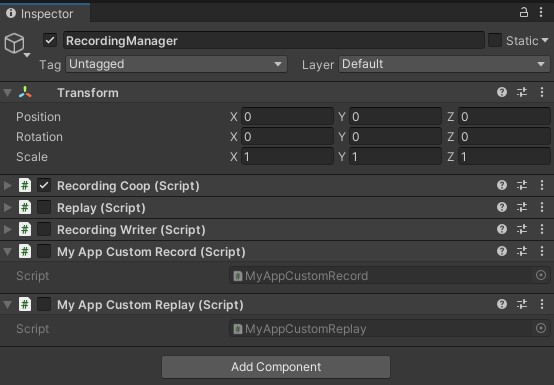
Integrate the scripts into the RecordingManager
The MyAppCustomRecord and MyAppCustomReplay have to be added at the RecordingManager GameObject. Note that the scripts have to be disabled since they are only enabled if we record or replay a session. Also, keep in mind that only one script inheriting from CustomRecord and CustomReplay has to be added in the RecordingManager. Thus, after adding those scripts, your RecordingManager GameObject should look like the picture below:
