VitalManager and Linecreator
In this tutorial we will learn how to set up and use the Vital Manager with the example prefab. Moreover, we will learn how to set up the Line Creator or a new waveform.
Vital Manager is a mechanic contained in the ovidVR.Utilities module, which enables controlling waveforms and values of a custom vital. Line Creator is a mechanic contained in ovidVR.Utilities module which gives the ability to the developer to create a line. The line has smaller lines, distinguished between curved and straight lines
Configure Line Creator
The first step is to Add the LineCreator component to your object. After doing that, you will be able to see that a LineRenderer component is also added. Your next step is to configure a small part of LineRenderer and add the material we are giving you with the name “LineCreatorMaterial”. To do so, go to LineRenderer and untick the “Use World Space”
After that, you are ready to create your own custom line! In the Line Creator there are 4 fields;
A color named Color
A float named Thickness
An integer named Wave Multiplier
A List of points named Custom Line
The color is used to change the color of the line, the thickness variable is used to change the thickness of the line. The wave multiplier, duplicates the wave and lastly the list of points lets us create smaller lines in order to create the final one.
When you add new points in the Custom Line field, you will be faced with the results below.
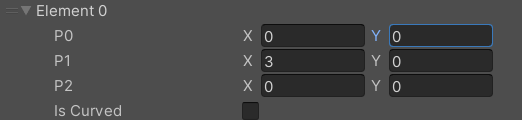
The P0, P1 and P2 are the points of the line. The boolean “Is Curved” is ticked only when we want to have a curved line. If we want to have a straight line, we only use the P0 and P1 points. If we want to have a curved line we use all the points plus we set true the “Is Curved”
Below is an example of adding both a curved and a straight line.
Importing the Vital Manager Prefab
The first step is to insert the prefab named “Vitals” in the Scene. You can find that in the folder VitalManagerPrefabExample. Then, simply drag and drop the prefab into the Hierarchy window. By doing that, you will be able to see in the Scene a Vitals Monitor, like the picture below.
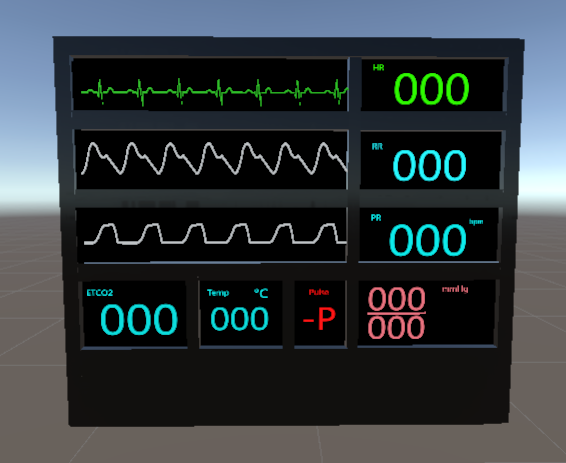
This is an example prefab named “Vitals” and you can practice with that to understand how the VitalManager works.
In order to access and configure the VitalManager, go to the gameobject named “Lines”. There, you will see the Vital Manager script with some examples.
- Vital Manager consists of three variables:
A List of the Vital UI and the Line Waveform
A boolean for storing the Vitals Values when they are changed.
A List of the Grouped UIs on the monitor.
Note
The type of Line Waveform is LineCreator. LineCreator is user to create your own lines (curved and straight), the color of it, the thickness of it and how many times to duplicate it. If you want to learn more about LineCreator and how to create your own lines, you should read the tutorial about LineCreator.
Now, let’s break down our first variable, the List of the Vital UI and the Line Waveform.
- The Vital UI has 5 fields:
A Text field named Text UI
A Float field named Vital Value
An Integer named Lerp Speed
A boolean named Vivid Status
Α list of 2 floats and one string names Custom Text
The Text UI is the text that we are going to set up the value of the vital, the vital value is the value of the vital, the lerp speed is the time that it needs for a value to be changed, and the vivid status is used to change the value of the vital by +1 and -1 every few seconds. For the list, there are 2 variables type float, one named min and one named max. If the vital value is between the min and max values, then the vital text is replaced with a string.
So, let’s create a Vital Text now! In the example video below, I will create a Vital UI for the ETCO2 line. First, I will select my ETCO2 gameobject and put it in the Text UI field. After that, I will set my Vital Status to 40 and my Lerp Speed to 10. Moreover, we will not include any custom texts. Lastly, I will set the Vivid status to true as well.
- After showing the VitalUI, it’s time to showcase the Line Waveform fields. It has 7 fields:
A list of Gameobjects named Abnormal Lines
A Gameobject named Current Waveform
An integer named Wave Speed
A float named Z Difference
A Gameobject named Hidder
A string named Current Waveform name
A bool named Exclude from Records
A Gameobject named backfaced Waveform
The abnormalLines variable as a pool of waveforms for the particullar gameobject. In the currentWaveform we represent which waveform is about to be drawn With the “Wave Speed” we can manage the time in which the waveform will be drawn. The “Z Difference” and the Hidder gameobject are connected. The hidder is the prefab we need to hide the previous line while the Z Difference is the position in Z axis where the old line will be spawned. Also, the hidder is an image gameobject, and thus, you can update the height and width of it. The “Current Waveform name” we get the name of the currently drawn waveform. With the “Exclude from Records” we dont log the changes of waveform for this gameobject. Lastly, with the “backfaced Waveform” we represent the waveform that is behind the currently drawn one.
Below is a set-up of all these fields we mentioned.
Warning
The hidder object must be child of the normal line. If you want to create patient’s monitor vital, you will need to activate both “Call Draw Reverse” and “Can Relocate”
- Moreover, we have the third field named Monitor Groups and it is a list that contains:
A string called Group Name
A gameobject called Group Gameobject
The “Group name” variable is used to store the name of the grouped ui and. In the “Group Gameobject” variable we store the grouped ui gameobject.
Note
Monitor Groups is not a precondition of the vital manager to work. This field is used only to help the developer be tidy on the vital’s screen.
Lastly, we have a list called Records where we store our logs. A records constis of 4 objects:
A string variable called Vital Name used to identify the vital name (used also for the numeric values of a vital)
A string variable called Old Value for the old vital.
A string variable called New Value for the new vital.
A float variable called Timer In Seconds that timestamps the change of the vital.
Records are depended from the boolean variable called Store to CSV where every change of vitals is timestamped and exported to a .CSV file
Changing the Vitals Values and Lines from code
With the Vital Manager comes 4 public functions where you can change real-time a line that is being drawn and a vital’s value.
To change a drawing line
To change a vital’s value
To find line
To find a text of a vital’s value.
using ovidVR.ActionPrototypes;
using ovidVR.Utilities.VitalManager;

public class UseAndCleanAction : BasePrototype
{
    public override void Initialize()
    {
        //Searches from the abnormal and normal lines of every vital waveform for the input name. Returns a gameobject
        Gameobject lineO2 = VitalManager.Instance.FindLine("O2_PP");

        //Changes the drawing line of the waveform that has the input line of the function.
        //For the example below, we the O2_PP waveform is an abnormal line of the O2 waveforms.
        //Thus, it will change the drawing line of the O2.
        VitalManager.Instance.ChangeDrawLine(lineO2);

        //Searches from the text fields of the vital manager, the text with the same name.
        Text textCardiacRythm = VitalManager.Instance.FindTextUI("CardiacRythmVitalText");

        //Changes the value of the text, with a fixed speed that can be changed from vital manager, to the input value.
        VitalManager.Instance.ChangeVitalValue(120,textCardiacRythm);
        base.Initialize();
    }
}